Wednesday, October 26, 2011

Lots of half-done stuff

I've hesitated to blog about H2 recently because frankly, there isn't any single project which is all done for me to show off. I have several that are almost done, and one that is done but I haven't photographed, so it seems a little blah to give half an update on a bunch of stuff. But you know what? That's exactly what I'm going to do anyway. Here goes-

The bed transformation is almost done...
This was an old waterbed that had a dark pine finish. My oldest daughter decided she wanted it because it has six drawers underneath which appeal to her hoarder instincts. We will use it as a platform bed with a regular mattress. The bed frame was sanded, primed and painted black, then I applied 2 coats of Finishing Wax to give it a hand-rubbed finish. Oh, the misery that waxing is for my shoulder. But it looks really nice except for a small spot on the headboard. I was painting in the sun and the paint was drying too fast (that happens with black paint, even though the air temperature wasn't hot  the painted surface was). I tried to sand out the bubble and re-paint, but it still looks bad. I'm going to sand down the entire top again and start over. I've been told that I'm being too picky, but after hand-rubbing this thing twice, I am not about to be lazy now and live with that imperfection right on the headboard. Those engraved flowers will probably be painted pink. At the very least I'll put a pink glaze in the crevices, still deciding on that.

The desk transformation is done, but I don't have finished photos yet.
This was my husband's desk when he was a child. It had several broken spots and he thought it should go straight out to the burn pile. But my youngest daughter liked it, and I liked the size and the many drawers. We measured her dormer and this fits perfectly in that space, less than half an inch on either side. I knew it could be cute when I was done and it is, can't wait to show it off.

The decoration above the laundry station is finished:
I vaguely remember typing up the entry on this but I don't think I had a completed photo. It is composed of a vintage window frame I'd bought at a salvage yard years ago and some honeysuckle vines I had in the garage. I used the honeysuckle about 10 years ago as garland on a Christmas tree. Since then I've picked at the coil I saved for projects here and there. The vines were secured into a loose wreath shape with taped wires (as in florist's tape). I used brown tape so the wires basically disappear.

We finished my oldest daughter's walk-in closet and it is now ready for her to start hanging clothes. It is just white wire shelving/rods that was left over from other projects. It turned out really nice, though, and I think it utilizes the space extremely well for a bunch of scraps.

The main floor bathroom has had lots of drywall patching. It needs another sanding and finish coat. After that is done we need to paint it, put the utility cabinet back in place, re-grout the tile, and replace the shower faucet and curtain rod.

On the other side of the laundry closet is the master bedroom. We need to drywall that side of the wall from where we expanded the laundry area and then the entire room needs to be painted. It doesn't have any flooring so before we can occupy it we'll need to decide whether it is getting hardwood or carpet. I think we might have to flip a coin as I want hardwood, my husband prefers carpet in a bedroom.

We still have a long way to go and right now it is a bit of a mess down there. However we are having an open house at H1 next weekend and we'd still like to sell it by the end of the year so we need to keep plugging away if we are to move into a finished home instead of a construction zone!

Tuesday, October 4, 2011

Laundry Pedestal How-to

When I first caved to the cool-kid peer pressure and ventured on over to pinterest.com, one of the first things that caught my eye was this gorgeous laundry pedestal. 
See lots more amazing stuff at the Show & Tell blog!
The link took me to the blog of Ana White, who had taken this gorgeous pedestal designed by Sausha of The Show and Tell blog and created easy to replicate plans.

1) I have since become a Pinterest addict.
2) Love, LOVE this laundry pedestal.
3) Free plans? This is what it so great about the internet- people sharing things for free.Thank you, Ana White!
4) Don't I have those exact laundry baskets?
5) Honey, the gift guide says 17th anniversary should be furniture...

Remember this picture?

Well those 2x4's became my version of this pedestal.
Once we started looking at the dimensions of the plans vs. our space, it was clear that we wouldn't be able to accommodate three baskets under the washer and dryer. This bummed me out because I liked the symmetry of three, not to mention the wording. Lights and Darks kind of loses something. I tried to come up with a clever way of wording that, but decided I didn't want to just be clever. I wanted it to be functional and dividing my laundry into two baskets just wasn't going to work.

I also discovered that my existing baskets were a hair too tall.

One day I was stolling through Walmart and my eyes landed on these:

Do you see the rounded triangles of the baskets? Don't they look a bit like the doors on the washer and dryer?
The baskets were even a beige color, similar to the champagne appliances. I decided to invest in two new baskets and worry about wording later.

I painted all the boards before my husband started cutting and assembling, one coat of primer and two coats of black semi-gloss paint. A couple ways we deviated from the original plans-

using a level to help locate the studs to screw the top on.
We could only accommodate two laundry baskets but we did have room for a center post. I decided to add that purely for decorative effect. Also, we did not use brackets to mount the 4x4's, instead we recessed them inside the frame on the top. We wanted a more finished edge so we trimmed out the front with 5" base molding (placing the top piece upside down). Then we added a decorative molding that is a series of squares. I liked this because I knew it would distress nicely and give a more polished look to the piece.

We assembled the top and the bottom but didn't connect the two by screwing in the bottom to the 4x4's until I'd had a chance to distress and wax the surface. I used a palm sander and lightly hit the edges of all visible surfaces. Then I used two coats of Minwax Finishing Wax to give it more of a hand-rubbed look and help protect the painted surface.

Now it looks like this:

I have decided to steal space in a nearby linen closet to store three more baskets. My laundry gets sorted into 5 different colors each week (an entire load of pink and one of dark purple/red) so having access to 5 baskets will be the most convenient. To finish off the pedestal, I am having Scott cut out vinyl letters for me at work. The letters will be white and spell out "Chambre de Blanchisserie" which I hope is French for Laundry Room. 
Unless you have a better suggestion? I'd love comments with other ideas!

Revamping an old window

I mentioned that my inspiration for my laundry closet came from the Show & Tell blog, which I spotted originally on 
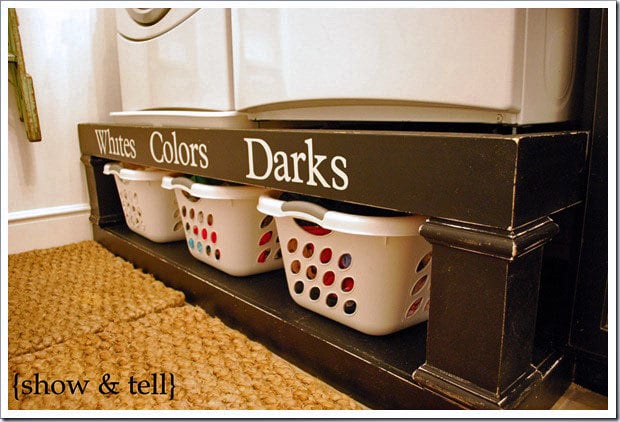
Pinterest.com. My closet is no where near as large as the laundry room pictured there but it was the inspiration for the pedestal with laundry basket storage underneath that Scott made and I also really liked the old door on the wall with a wreath. I don't happen to have an old door laying around, but I do have an old window. In my scaled-down version of this laundry area, I think that the window will be perfect. I even have some old honeysuckle vine out in the garage that I plan to use to make a wispy wreath.

I see a lot of people showing off their old windows so I thought I focus on telling you what I do to clean them up. This particular old window is one that I purchased at Heritage Architectural Supply, a place that specializes in pieces and parts of old buildings. You will pay more for mantles, corbels, doors and windows at a salvage place such as this than you would at a garage sale, but it is pretty much guaranteed instant gratification. About 13 years ago, when I was doing stained glass, I bought several old windows to put newly made stained glass panels in. This one I always liked so I didn't use it for a project to sell. It was just collecting dust in the garage, so I'm happy to finally give it new life.

As you can see, this window was missing one pane of glass. I could have tried to replace it, but instead I decided to remove all the glass and make the frame just a little lighter weight for hanging. I don't want the glare from the lights on the glass and I don't want them looking dusty from the lint that would likely collect on it over time. Because it is kind of a tight squeeze over the washer and dryer, once this is in place it will stay there for a good long while.

There are a couple precautions you need to consider when removing glass from an old frame. First, obviously, you don't want to get cut. The other consideration is lead. I can pretty much guarantee you that if your window looks like mine, it was painted with lead-based paint. Because of that, take some time to research safe handling of lead-painted items. Do not grab a palm sander and start sanding away at the finish without learning about the dangers of breathing in lead dust. I'm not an expert by any means, but I do take lead poisoning seriously.

To remove the glass I used:
cardboard box
gloves
old rag
hammer
standard head screwdriver
Closed-toed shoes and safety glasses would be a good idea
Damp disposable rag
Matte finish polyurethane spray

The safest way to remove the glass is to break it over a disposable cardboard box. Do this in an area where your family won't be walking barefoot as there may be glass shards that don't land in the box. Place the frame over the box and lay an old rag over the top of the glass. Give the glass a good whack in one of the corners. Chances are good that it will shatter, a few pieces will drop but some huge razor sharp shards will remain, especially if the glazing around the edges is still pretty strong. You'll need to wear gloves so you can gently break all the glass out of the window.

Any small shards that remain will need to be broken out using the screwdriver. Tap it along the groove on all sides to get any remaining pieces dislodged. You may find glazier's points, small metal tips that were used to hold the glass next to the wood. Knock these out with the tip of the screwdriver. These are sharp, just like the glass, so it is important to wear heavy gloves at all times.
Those little metal wedges are glazier's points.
After the glass is removed, use a damp disposable rag to wipe down the frame. This will remove any dust and cobwebs as well as tiny bits of glass that might remain. Being damp, the rag is less likely to disturb any lead in the paint of the window, but just in case throw the rag away when you are done. At this time you can paint your window with latex primer and paint or else seal the surface with a matte finish polyurethane. It is important to finish it as you want to seal in any lead so that it doesn't shed any lead-laced dust inside your home. I went the clear poly route because I love the chippy wood that has accents of a spice and pale aqua.

This is how it looks above the washer and dryer now, topped with some honeysuckle vine that was loosely wired into a wreath:

Here's a close up of that glorious chippy texture.
By the way, the wall color in the laundry closet is Pittsburgh Paint's Big Cypress. I decided on that color before I pulled the window frame out of the dusty corner in the garage. I was amazed at just how close a match the color is, I wasn't trying to match. But once I saw it, I used the grayish aqua color on the frame to help inspire the spare bathroom, which is the room immediately to the left of the laundry closet. That color also happens to be just a shade or two lighter than the shower curtain that is going in the spare bathroom. I love it when things randomly come together like that!

Laundry room reveal

Are you ready?!

We managed to get everything done in time. Friday night when Scott came home he had painted the ceiling and finished assembling the pedestal so it was ready to go. Lowe's gave us a time between noon and 2:00 which worked out well for our kids' sports schedules. We had a cross country invitational in the morning, 45 minutes away at 9 am. Our cheerleader didn't have to be at her game until 1:30pm but it was local. Lowe's arrived shortly after noon and finished installing in time for all of us to head off to her game.

A friend of ours had a daughter on the opposing team's cheer squad so we decided to take in a late lunch at Pizza Hut together before making a quick Home Depot run. I had left H2 to help my daughter get her hair done for cheering so at this point I hadn't even seen the appliances in place. Scott told me that everything worked great but when the washer was going he had a small leak in the basement. He needed to replace a fitting and it would be good to go.

I won't say I was excited to do laundry, but I was excited to see how the pretty new appliances worked. I wanted to see if my colors looked good, how they looked on the pedestal. Oh, forget the pretense of being cool- I was excited to do laundry. What has my life come to?

Anyway, I drooled over my new machines and read the encyclopedia-sized manuals while Scott replaced the fitting. Then there was a scream from the basement. Apparently when he replaced one fitting, he overheated and screwed up another. A ten minute project turned into 30. Tick, tick, tick... would like to try the machines out before the ND game.... tick, tick, tick....

So I think I've made you wait long enough. Here it is- a lousy picture from my phone, but this is the fancy new appliances in place on the pedestal:


*sigh*
My girlfriend called it porn. {snicker} Laundry Porn, I love it. I had planned to have my husband print off vinyl letters that say, "Chambre de Blanchisserie" to place on the pedestal as that is supposed to mean something akin to 'Laundry Room' in French. But maybe I should use "Laundry Porn" instead?

Of course, some tweaks are required. First, I will not keep the baskets on top. I thought maybe that would work for storing soap and stuff, but actually there is room next to the baskets below and it is easier on my shoulder to lift soap up than pull it down. I have an old window frame which I need to clean up a little, knock a couple panes of glass out of, and hang on the back wall. I might even add a wreath to get the full effect from the laundry room I saw that I loved. If you are going to be a style thief, why not go all the way?

I'm debating about painting the ceiling the same color as the walls. I think the white ceiling is almost a distraction from that gorgeous color. I thought I'd want the white ceiling for the extra light, but now that we have the bright halogen light fixture I don't think it is necessary. I'm also considering having Scott build me a large black shelf above the washer and dryer so that I can put baskets and folded laundry up there without them dancing around when the washer is in spin cycle. Holy moly does that thing spin fast, it is like a plane getting ready for take off! There isn't a lot of vibration, but the surface is so slick on top that the baskets do shimmy quite a bit.

I also have a spot on the front edge of the black pedestal where the delivery guys scraped the paint off my stand. Not in an attractive, 'a little extra distressing' way. That needs to be repaired. And of course the walls outside need to be painted and trimmed and the closet doors put on. It will be a while before I can call this project completely done.

A review on the washer and dryer is coming soon, once I've had a chance to play with a few more cycles. The DIY instructions on the laundry stand and more detailed photos of it are coming soon too. I'll edit to add links when those posts are completed.

Thanks for checking it out... off to go see how my overnight-ready cycle worked on the washer!