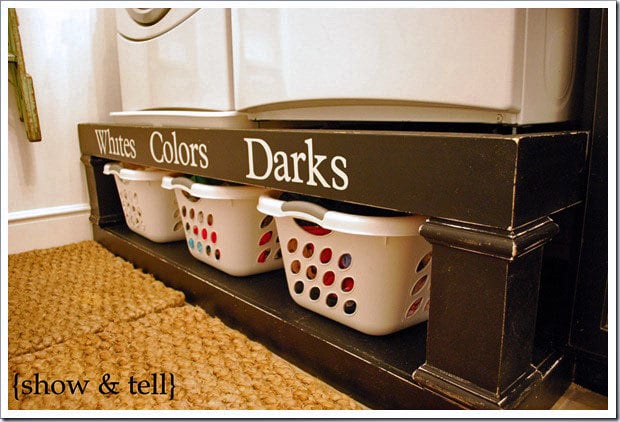
I'm sure I've mentioned this, but H2 is a four bedroom home. Our family of four will only need three of those bedrooms, which leaves the smallest bedroom as a bonus room. What to do with it?
The obvious options are guest room or home office. It was previously used as a sewing room, so any sort of crafting space would work as well. Since I work from home making jewelry and other assorted projects, I've decided this will be the perfect spot for my new studio.
Currently, it is storing all the things that used to be in my studio, a space about 6 times larger than this room.
Bedroom #4 circle tour... ignore the mess! The window looks out onto the covered porch and front yard. Moving to the right, there is a wall about 6' long. On a slight angle, the next wall comes in. Then the door to the hall, followed by a large closet with bifold doors.
My previous studio was in the downstairs of our walkout ranch, all the way back. It had a cement floor that had been painted to look like slate tiles which was very convenient for a studio, especially when I was making stained glass. But as my projects changed and our family grew, it turned into a large storage room and was kind of cold what with being downstairs and having a cement floor. I want something just as functional and easy to clean, but also more of a show room where I can bring clients and also a cozy place to work. I want to have my computer handy and incorporate a shipping station so I can package items without leaving my space to fetch boxes or tape.
I can't get too carried away yet as we will most likely be stealing some space from this room for the master bathroom. We plan to revert to the original house plans and use about half of this room's closet for the master bathroom's shower. Flooring won't be installed until we do the entire lower level. However this is the one room that pets really weren't allowed which is why it was the first place we used for storage. What I can do is paint, install wall cabinets, and start organizing my studio so that I don't have to continue turning away business. Not to mention freeing up the floor space by finding a home for all of my supplies.
Currently we have three rooms going simultaneously, so the progress happens in fits and starts. After making a plan for this room, the only thing I've done is remove the wallpaper border. The next step is to remove the baseboards and primer, then paint. Finally, I'll refinish the cabinets that are going in this room and mount the wall cabinets. They will be going on that 6' wall. This should leave me with enough room to use a large table in the center of the room as a layout area. I plan to find a cushy chair on casters that can serve as seating at the table or rotated 180 degrees, work at the counter space on the cabinet wall.
Originally, I had a plan to paint the walls a dusty grayish mauve color, then put both a chocolate and a white glaze on maple cabinets. Curtains and art would be shades of white, cream, and beige. Think Ballard Designs. I have two off-white media cabinets which I planned to put in here, repurposed for storing supplies and finished jewelry. Then I saw a couple 2012 trend ideas that I really liked. One had plum colored walls and the other a rich emerald. Both used distressed black furniture/cabinets and chandeliers, very gothic looking. I have to say, both rooms grabbed my attention and I thought, "I want to go there!" Which makes me wonder if it is time to tap into the dark side, create a space that feels more like a creative cocoon than floating on a cloud. This is my space and the only things that are set in stone are the window and white trim. After that, anything goes. What do you like better? Leave a comment and give me your vote- gothic or ethereal.
Tuesday, November 8, 2011
Wednesday, November 2, 2011
Desk makeover
One of the items that happened to be in the garage at H2 was my husband's childhood desk. It was given to him by his aunt. I think our niece used it as well, but the desk itself was showing it's age. This is a picture of how it started:
Ok, that isn't exactly how it started. There were three wooden knobs and the top wasn't sanded. Two of the drawers had missing backs and two of the wood pieces that support the drawers had fallen off. But you get the idea, it was in rough shape. My daughter saw the potential, though, and wanted this painted green for her bedroom. On the whole, it was a pretty easy and fast refinish.
You might be able to see that I distressed the edges slightly with a sander. This brings up a faint white line from the primer and gives this simple piece a little dimension and enhances the fact that it is a vintage desk. I put several coats of Minwax finishing wax over the top surface to give it some protection. I didn't bother with the sides because as you can tell, noting can really touch them in this location.
Give me your thoughts! Makeover success?
Ok, that isn't exactly how it started. There were three wooden knobs and the top wasn't sanded. Two of the drawers had missing backs and two of the wood pieces that support the drawers had fallen off. But you get the idea, it was in rough shape. My daughter saw the potential, though, and wanted this painted green for her bedroom. On the whole, it was a pretty easy and fast refinish.
First things first, there was a spot on the top corner I had to patch with wood filler. This stuff is really stiff, but works well. This is what it looked like after it was filled but before I sanded it down-
I used a palm sander to sand the entire finish off the desk. I'm not sure of the wood, perhaps mahogany or cherry. The wood was red straight through so it wasn't simply a stain. After sanding-
Next, I rolled primer on. With all the primer options, I'll be honest. I rolled on the Zinsser primer we happened to have. It did not list bare wood on the label, but I ignored this. It took 3-4 coats of primer to completely mask all of the wood. Three for most of the desk, four for the drawer faces and top because they are the most visible surfaces.
I didn't think to take a picture of it after priming, basically picture it white. I had planned to have paint mixed to the right shade of green and roll it on, but happened to see a can of Rustoleum brand paint in nearly the exact shade of green my daughter picked out. I put about 4 coats on which required all of one and part of another 2X (twice the coverage) cans.
Since I already had these knobs leftover from an old loft bed, we decided to reuse them. You can see two are missing, that is because two of the screws that were with the knobs were too short.
The desk fits perfectly into her dormer. As in, an inch more and it wouldn't have worked.
I promised I'd show you how the top came out. The bad spot was right above this heart sticker. Can't even tell now, can you? That wood filler has probably saved us $500 in doors that my husband has been able to salvage instead of replace. The door jambs in nearly every interior door have been clawed to bits by cats. Like the surface of the desk, however, once they have been filled, sanded, primed and painted, you would never know.
You might be able to see that I distressed the edges slightly with a sander. This brings up a faint white line from the primer and gives this simple piece a little dimension and enhances the fact that it is a vintage desk. I put several coats of Minwax finishing wax over the top surface to give it some protection. I didn't bother with the sides because as you can tell, noting can really touch them in this location.
Give me your thoughts! Makeover success?
Wednesday, October 26, 2011
Lots of half-done stuff
I've hesitated to blog about H2 recently because frankly, there isn't any single project which is all done for me to show off. I have several that are almost done, and one that is done but I haven't photographed, so it seems a little blah to give half an update on a bunch of stuff. But you know what? That's exactly what I'm going to do anyway. Here goes-
The bed transformation is almost done...
This was an old waterbed that had a dark pine finish. My oldest daughter decided she wanted it because it has six drawers underneath which appeal to her hoarder instincts. We will use it as a platform bed with a regular mattress. The bed frame was sanded, primed and painted black, then I applied 2 coats of Finishing Wax to give it a hand-rubbed finish. Oh, the misery that waxing is for my shoulder. But it looks really nice except for a small spot on the headboard. I was painting in the sun and the paint was drying too fast (that happens with black paint, even though the air temperature wasn't hot the painted surface was). I tried to sand out the bubble and re-paint, but it still looks bad. I'm going to sand down the entire top again and start over. I've been told that I'm being too picky, but after hand-rubbing this thing twice, I am not about to be lazy now and live with that imperfection right on the headboard. Those engraved flowers will probably be painted pink. At the very least I'll put a pink glaze in the crevices, still deciding on that.
The desk transformation is done, but I don't have finished photos yet.
This was my husband's desk when he was a child. It had several broken spots and he thought it should go straight out to the burn pile. But my youngest daughter liked it, and I liked the size and the many drawers. We measured her dormer and this fits perfectly in that space, less than half an inch on either side. I knew it could be cute when I was done and it is, can't wait to show it off.
The decoration above the laundry station is finished:
I vaguely remember typing up the entry on this but I don't think I had a completed photo. It is composed of a vintage window frame I'd bought at a salvage yard years ago and some honeysuckle vines I had in the garage. I used the honeysuckle about 10 years ago as garland on a Christmas tree. Since then I've picked at the coil I saved for projects here and there. The vines were secured into a loose wreath shape with taped wires (as in florist's tape). I used brown tape so the wires basically disappear.
We finished my oldest daughter's walk-in closet and it is now ready for her to start hanging clothes. It is just white wire shelving/rods that was left over from other projects. It turned out really nice, though, and I think it utilizes the space extremely well for a bunch of scraps.
The main floor bathroom has had lots of drywall patching. It needs another sanding and finish coat. After that is done we need to paint it, put the utility cabinet back in place, re-grout the tile, and replace the shower faucet and curtain rod.
On the other side of the laundry closet is the master bedroom. We need to drywall that side of the wall from where we expanded the laundry area and then the entire room needs to be painted. It doesn't have any flooring so before we can occupy it we'll need to decide whether it is getting hardwood or carpet. I think we might have to flip a coin as I want hardwood, my husband prefers carpet in a bedroom.
We still have a long way to go and right now it is a bit of a mess down there. However we are having an open house at H1 next weekend and we'd still like to sell it by the end of the year so we need to keep plugging away if we are to move into a finished home instead of a construction zone!
The bed transformation is almost done...
This was an old waterbed that had a dark pine finish. My oldest daughter decided she wanted it because it has six drawers underneath which appeal to her hoarder instincts. We will use it as a platform bed with a regular mattress. The bed frame was sanded, primed and painted black, then I applied 2 coats of Finishing Wax to give it a hand-rubbed finish. Oh, the misery that waxing is for my shoulder. But it looks really nice except for a small spot on the headboard. I was painting in the sun and the paint was drying too fast (that happens with black paint, even though the air temperature wasn't hot the painted surface was). I tried to sand out the bubble and re-paint, but it still looks bad. I'm going to sand down the entire top again and start over. I've been told that I'm being too picky, but after hand-rubbing this thing twice, I am not about to be lazy now and live with that imperfection right on the headboard. Those engraved flowers will probably be painted pink. At the very least I'll put a pink glaze in the crevices, still deciding on that.
The desk transformation is done, but I don't have finished photos yet.
This was my husband's desk when he was a child. It had several broken spots and he thought it should go straight out to the burn pile. But my youngest daughter liked it, and I liked the size and the many drawers. We measured her dormer and this fits perfectly in that space, less than half an inch on either side. I knew it could be cute when I was done and it is, can't wait to show it off.
The decoration above the laundry station is finished:
I vaguely remember typing up the entry on this but I don't think I had a completed photo. It is composed of a vintage window frame I'd bought at a salvage yard years ago and some honeysuckle vines I had in the garage. I used the honeysuckle about 10 years ago as garland on a Christmas tree. Since then I've picked at the coil I saved for projects here and there. The vines were secured into a loose wreath shape with taped wires (as in florist's tape). I used brown tape so the wires basically disappear.
We finished my oldest daughter's walk-in closet and it is now ready for her to start hanging clothes. It is just white wire shelving/rods that was left over from other projects. It turned out really nice, though, and I think it utilizes the space extremely well for a bunch of scraps.
The main floor bathroom has had lots of drywall patching. It needs another sanding and finish coat. After that is done we need to paint it, put the utility cabinet back in place, re-grout the tile, and replace the shower faucet and curtain rod.
On the other side of the laundry closet is the master bedroom. We need to drywall that side of the wall from where we expanded the laundry area and then the entire room needs to be painted. It doesn't have any flooring so before we can occupy it we'll need to decide whether it is getting hardwood or carpet. I think we might have to flip a coin as I want hardwood, my husband prefers carpet in a bedroom.
We still have a long way to go and right now it is a bit of a mess down there. However we are having an open house at H1 next weekend and we'd still like to sell it by the end of the year so we need to keep plugging away if we are to move into a finished home instead of a construction zone!
Tuesday, October 4, 2011
Laundry Pedestal How-to
When I first caved to the cool-kid peer pressure and ventured on over to pinterest.com, one of the first things that caught my eye was this gorgeous laundry pedestal.
| See lots more amazing stuff at the Show & Tell blog! |
1) I have since become a Pinterest addict.
2) Love, LOVE this laundry pedestal.
3) Free plans? This is what it so great about the internet- people sharing things for free.Thank you, Ana White!
4) Don't I have those exact laundry baskets?
5) Honey, the gift guide says 17th anniversary should be furniture...
Remember this picture?
Well those 2x4's became my version of this pedestal.
Once we started looking at the dimensions of the plans vs. our space, it was clear that we wouldn't be able to accommodate three baskets under the washer and dryer. This bummed me out because I liked the symmetry of three, not to mention the wording. Lights and Darks kind of loses something. I tried to come up with a clever way of wording that, but decided I didn't want to just be clever. I wanted it to be functional and dividing my laundry into two baskets just wasn't going to work.
I also discovered that my existing baskets were a hair too tall.
One day I was stolling through Walmart and my eyes landed on these:
Do you see the rounded triangles of the baskets? Don't they look a bit like the doors on the washer and dryer?
The baskets were even a beige color, similar to the champagne appliances. I decided to invest in two new baskets and worry about wording later.
I painted all the boards before my husband started cutting and assembling, one coat of primer and two coats of black semi-gloss paint. A couple ways we deviated from the original plans-
![]() |
| using a level to help locate the studs to screw the top on. |
We assembled the top and the bottom but didn't connect the two by screwing in the bottom to the 4x4's until I'd had a chance to distress and wax the surface. I used a palm sander and lightly hit the edges of all visible surfaces. Then I used two coats of Minwax Finishing Wax to give it more of a hand-rubbed look and help protect the painted surface.
Now it looks like this:
I have decided to steal space in a nearby linen closet to store three more baskets. My laundry gets sorted into 5 different colors each week (an entire load of pink and one of dark purple/red) so having access to 5 baskets will be the most convenient. To finish off the pedestal, I am having Scott cut out vinyl letters for me at work. The letters will be white and spell out "Chambre de Blanchisserie" which I hope is French for Laundry Room.
Unless you have a better suggestion? I'd love comments with other ideas!
Revamping an old window
I mentioned that my inspiration for my laundry closet came from the Show & Tell blog, which I spotted originally on Pinterest.com. My closet is no where near as large as the laundry room pictured there but it was the inspiration for the pedestal with laundry basket storage underneath that Scott made and I also really liked the old door on the wall with a wreath. I don't happen to have an old door laying around, but I do have an old window. In my scaled-down version of this laundry area, I think that the window will be perfect. I even have some old honeysuckle vine out in the garage that I plan to use to make a wispy wreath.
I see a lot of people showing off their old windows so I thought I focus on telling you what I do to clean them up. This particular old window is one that I purchased at Heritage Architectural Supply, a place that specializes in pieces and parts of old buildings. You will pay more for mantles, corbels, doors and windows at a salvage place such as this than you would at a garage sale, but it is pretty much guaranteed instant gratification. About 13 years ago, when I was doing stained glass, I bought several old windows to put newly made stained glass panels in. This one I always liked so I didn't use it for a project to sell. It was just collecting dust in the garage, so I'm happy to finally give it new life.
As you can see, this window was missing one pane of glass. I could have tried to replace it, but instead I decided to remove all the glass and make the frame just a little lighter weight for hanging. I don't want the glare from the lights on the glass and I don't want them looking dusty from the lint that would likely collect on it over time. Because it is kind of a tight squeeze over the washer and dryer, once this is in place it will stay there for a good long while.
There are a couple precautions you need to consider when removing glass from an old frame. First, obviously, you don't want to get cut. The other consideration is lead. I can pretty much guarantee you that if your window looks like mine, it was painted with lead-based paint. Because of that, take some time to research safe handling of lead-painted items. Do not grab a palm sander and start sanding away at the finish without learning about the dangers of breathing in lead dust. I'm not an expert by any means, but I do take lead poisoning seriously.
To remove the glass I used:
cardboard box
gloves
old rag
hammer
standard head screwdriver
Closed-toed shoes and safety glasses would be a good idea
Damp disposable rag
Matte finish polyurethane spray
The safest way to remove the glass is to break it over a disposable cardboard box. Do this in an area where your family won't be walking barefoot as there may be glass shards that don't land in the box. Place the frame over the box and lay an old rag over the top of the glass. Give the glass a good whack in one of the corners. Chances are good that it will shatter, a few pieces will drop but some huge razor sharp shards will remain, especially if the glazing around the edges is still pretty strong. You'll need to wear gloves so you can gently break all the glass out of the window.
Any small shards that remain will need to be broken out using the screwdriver. Tap it along the groove on all sides to get any remaining pieces dislodged. You may find glazier's points, small metal tips that were used to hold the glass next to the wood. Knock these out with the tip of the screwdriver. These are sharp, just like the glass, so it is important to wear heavy gloves at all times.
After the glass is removed, use a damp disposable rag to wipe down the frame. This will remove any dust and cobwebs as well as tiny bits of glass that might remain. Being damp, the rag is less likely to disturb any lead in the paint of the window, but just in case throw the rag away when you are done. At this time you can paint your window with latex primer and paint or else seal the surface with a matte finish polyurethane. It is important to finish it as you want to seal in any lead so that it doesn't shed any lead-laced dust inside your home. I went the clear poly route because I love the chippy wood that has accents of a spice and pale aqua.
This is how it looks above the washer and dryer now, topped with some honeysuckle vine that was loosely wired into a wreath:
Here's a close up of that glorious chippy texture.
By the way, the wall color in the laundry closet is Pittsburgh Paint's Big Cypress. I decided on that color before I pulled the window frame out of the dusty corner in the garage. I was amazed at just how close a match the color is, I wasn't trying to match. But once I saw it, I used the grayish aqua color on the frame to help inspire the spare bathroom, which is the room immediately to the left of the laundry closet. That color also happens to be just a shade or two lighter than the shower curtain that is going in the spare bathroom. I love it when things randomly come together like that!
I see a lot of people showing off their old windows so I thought I focus on telling you what I do to clean them up. This particular old window is one that I purchased at Heritage Architectural Supply, a place that specializes in pieces and parts of old buildings. You will pay more for mantles, corbels, doors and windows at a salvage place such as this than you would at a garage sale, but it is pretty much guaranteed instant gratification. About 13 years ago, when I was doing stained glass, I bought several old windows to put newly made stained glass panels in. This one I always liked so I didn't use it for a project to sell. It was just collecting dust in the garage, so I'm happy to finally give it new life.
As you can see, this window was missing one pane of glass. I could have tried to replace it, but instead I decided to remove all the glass and make the frame just a little lighter weight for hanging. I don't want the glare from the lights on the glass and I don't want them looking dusty from the lint that would likely collect on it over time. Because it is kind of a tight squeeze over the washer and dryer, once this is in place it will stay there for a good long while.
There are a couple precautions you need to consider when removing glass from an old frame. First, obviously, you don't want to get cut. The other consideration is lead. I can pretty much guarantee you that if your window looks like mine, it was painted with lead-based paint. Because of that, take some time to research safe handling of lead-painted items. Do not grab a palm sander and start sanding away at the finish without learning about the dangers of breathing in lead dust. I'm not an expert by any means, but I do take lead poisoning seriously.
To remove the glass I used:
cardboard box
gloves
old rag
hammer
standard head screwdriver
Closed-toed shoes and safety glasses would be a good idea
Damp disposable rag
Matte finish polyurethane spray
The safest way to remove the glass is to break it over a disposable cardboard box. Do this in an area where your family won't be walking barefoot as there may be glass shards that don't land in the box. Place the frame over the box and lay an old rag over the top of the glass. Give the glass a good whack in one of the corners. Chances are good that it will shatter, a few pieces will drop but some huge razor sharp shards will remain, especially if the glazing around the edges is still pretty strong. You'll need to wear gloves so you can gently break all the glass out of the window.
Any small shards that remain will need to be broken out using the screwdriver. Tap it along the groove on all sides to get any remaining pieces dislodged. You may find glazier's points, small metal tips that were used to hold the glass next to the wood. Knock these out with the tip of the screwdriver. These are sharp, just like the glass, so it is important to wear heavy gloves at all times.
![]() |
| Those little metal wedges are glazier's points. |
This is how it looks above the washer and dryer now, topped with some honeysuckle vine that was loosely wired into a wreath:
Here's a close up of that glorious chippy texture.
By the way, the wall color in the laundry closet is Pittsburgh Paint's Big Cypress. I decided on that color before I pulled the window frame out of the dusty corner in the garage. I was amazed at just how close a match the color is, I wasn't trying to match. But once I saw it, I used the grayish aqua color on the frame to help inspire the spare bathroom, which is the room immediately to the left of the laundry closet. That color also happens to be just a shade or two lighter than the shower curtain that is going in the spare bathroom. I love it when things randomly come together like that!
Laundry room reveal
Are you ready?!
We managed to get everything done in time. Friday night when Scott came home he had painted the ceiling and finished assembling the pedestal so it was ready to go. Lowe's gave us a time between noon and 2:00 which worked out well for our kids' sports schedules. We had a cross country invitational in the morning, 45 minutes away at 9 am. Our cheerleader didn't have to be at her game until 1:30pm but it was local. Lowe's arrived shortly after noon and finished installing in time for all of us to head off to her game.
A friend of ours had a daughter on the opposing team's cheer squad so we decided to take in a late lunch at Pizza Hut together before making a quick Home Depot run. I had left H2 to help my daughter get her hair done for cheering so at this point I hadn't even seen the appliances in place. Scott told me that everything worked great but when the washer was going he had a small leak in the basement. He needed to replace a fitting and it would be good to go.
I won't say I was excited to do laundry, but I was excited to see how the pretty new appliances worked. I wanted to see if my colors looked good, how they looked on the pedestal. Oh, forget the pretense of being cool- I was excited to do laundry. What has my life come to?
Anyway, I drooled over my new machines and read the encyclopedia-sized manuals while Scott replaced the fitting. Then there was a scream from the basement. Apparently when he replaced one fitting, he overheated and screwed up another. A ten minute project turned into 30. Tick, tick, tick... would like to try the machines out before the ND game.... tick, tick, tick....
So I think I've made you wait long enough. Here it is- a lousy picture from my phone, but this is the fancy new appliances in place on the pedestal:
*sigh*
My girlfriend called it porn. {snicker} Laundry Porn, I love it. I had planned to have my husband print off vinyl letters that say, "Chambre de Blanchisserie" to place on the pedestal as that is supposed to mean something akin to 'Laundry Room' in French. But maybe I should use "Laundry Porn" instead?
Of course, some tweaks are required. First, I will not keep the baskets on top. I thought maybe that would work for storing soap and stuff, but actually there is room next to the baskets below and it is easier on my shoulder to lift soap up than pull it down. I have an old window frame which I need to clean up a little, knock a couple panes of glass out of, and hang on the back wall. I might even add a wreath to get the full effect from the laundry room I saw that I loved. If you are going to be a style thief, why not go all the way?
I'm debating about painting the ceiling the same color as the walls. I think the white ceiling is almost a distraction from that gorgeous color. I thought I'd want the white ceiling for the extra light, but now that we have the bright halogen light fixture I don't think it is necessary. I'm also considering having Scott build me a large black shelf above the washer and dryer so that I can put baskets and folded laundry up there without them dancing around when the washer is in spin cycle. Holy moly does that thing spin fast, it is like a plane getting ready for take off! There isn't a lot of vibration, but the surface is so slick on top that the baskets do shimmy quite a bit.
I also have a spot on the front edge of the black pedestal where the delivery guys scraped the paint off my stand. Not in an attractive, 'a little extra distressing' way. That needs to be repaired. And of course the walls outside need to be painted and trimmed and the closet doors put on. It will be a while before I can call this project completely done.
A review on the washer and dryer is coming soon, once I've had a chance to play with a few more cycles. The DIY instructions on the laundry stand and more detailed photos of it are coming soon too. I'll edit to add links when those posts are completed.
Thanks for checking it out... off to go see how my overnight-ready cycle worked on the washer!
We managed to get everything done in time. Friday night when Scott came home he had painted the ceiling and finished assembling the pedestal so it was ready to go. Lowe's gave us a time between noon and 2:00 which worked out well for our kids' sports schedules. We had a cross country invitational in the morning, 45 minutes away at 9 am. Our cheerleader didn't have to be at her game until 1:30pm but it was local. Lowe's arrived shortly after noon and finished installing in time for all of us to head off to her game.
A friend of ours had a daughter on the opposing team's cheer squad so we decided to take in a late lunch at Pizza Hut together before making a quick Home Depot run. I had left H2 to help my daughter get her hair done for cheering so at this point I hadn't even seen the appliances in place. Scott told me that everything worked great but when the washer was going he had a small leak in the basement. He needed to replace a fitting and it would be good to go.
I won't say I was excited to do laundry, but I was excited to see how the pretty new appliances worked. I wanted to see if my colors looked good, how they looked on the pedestal. Oh, forget the pretense of being cool- I was excited to do laundry. What has my life come to?
Anyway, I drooled over my new machines and read the encyclopedia-sized manuals while Scott replaced the fitting. Then there was a scream from the basement. Apparently when he replaced one fitting, he overheated and screwed up another. A ten minute project turned into 30. Tick, tick, tick... would like to try the machines out before the ND game.... tick, tick, tick....
So I think I've made you wait long enough. Here it is- a lousy picture from my phone, but this is the fancy new appliances in place on the pedestal:
*sigh*
My girlfriend called it porn. {snicker} Laundry Porn, I love it. I had planned to have my husband print off vinyl letters that say, "Chambre de Blanchisserie" to place on the pedestal as that is supposed to mean something akin to 'Laundry Room' in French. But maybe I should use "Laundry Porn" instead?
Of course, some tweaks are required. First, I will not keep the baskets on top. I thought maybe that would work for storing soap and stuff, but actually there is room next to the baskets below and it is easier on my shoulder to lift soap up than pull it down. I have an old window frame which I need to clean up a little, knock a couple panes of glass out of, and hang on the back wall. I might even add a wreath to get the full effect from the laundry room I saw that I loved. If you are going to be a style thief, why not go all the way?
I'm debating about painting the ceiling the same color as the walls. I think the white ceiling is almost a distraction from that gorgeous color. I thought I'd want the white ceiling for the extra light, but now that we have the bright halogen light fixture I don't think it is necessary. I'm also considering having Scott build me a large black shelf above the washer and dryer so that I can put baskets and folded laundry up there without them dancing around when the washer is in spin cycle. Holy moly does that thing spin fast, it is like a plane getting ready for take off! There isn't a lot of vibration, but the surface is so slick on top that the baskets do shimmy quite a bit.
I also have a spot on the front edge of the black pedestal where the delivery guys scraped the paint off my stand. Not in an attractive, 'a little extra distressing' way. That needs to be repaired. And of course the walls outside need to be painted and trimmed and the closet doors put on. It will be a while before I can call this project completely done.
A review on the washer and dryer is coming soon, once I've had a chance to play with a few more cycles. The DIY instructions on the laundry stand and more detailed photos of it are coming soon too. I'll edit to add links when those posts are completed.
Thanks for checking it out... off to go see how my overnight-ready cycle worked on the washer!
Friday, September 30, 2011
Nearing the deadline
Man, for just being a closet for laundry, this little area sure is requiring a lot of time and blog space!
This morning I sanded the drywall that Scott touched up last night as well as the ceiling. Have I mentioned before that I really dislike sanding drywall? Because I do dislike it, a lot. Normally I wouldn't even touch the ceiling as anything over my head is out of my domain, but it was looking pretty good so I thought I'd give it a go and see if we were at the point of calling it done. Covered in drywall dust head to toe, I felt like the stay-puff marshmallow man.
Before we can paint the ceiling, we needed to try to match the knockdown texture. We did all the drywall when we built the house nine years ago, and in some places it looks great. In others you can observe our amateur status. We weren't pros at drywall but we were kind of forced to take that task on to get our budget back on track after the contractor (we shall call him Nimrod) 'forgot' to include the cost of trusses in his bid. Eliminating the labor expense on drywall was a big step toward recovering our budget. Not being pros, however, we weren't doing anything fancy on the ceilings. I know that the popcorn look would have been the most forgiving but it is also something people seem to loathe with a passion so we compromised with a knock down texture that would mask imperfections.
To blend the extended ceiling into the old, we were not about to go through the mess and expense of renting a professional sprayer. For such a small area we bought a can of spray-on ceiling texture and hoped it would work ok. Scott came home at lunch today and put the texture up while my primer dried so I could get two coats of paint on the walls today.
He did a test spray on a piece of scrap drywall just to get a feel for the spray pattern. It was easy enough, just twist the nozzle, spray to desired thickness, let rest for a few minutes and use a 6-8" drywall knife to knock it down. After applying it we both felt there were a few areas that could use a little heavier texture so he touched up those spots. Within half an hour he was completely done with a 1' x 5' section. It isn't an exact match but close enough, especially for the laundry closet.Then my fun began.
I don't mind painting, but boring white primer and white semi-gloss on all the trim is getting old. White, white, give me color! I was dying to see if I liked the color I picked on the walls because if I didn't like it today was my one and only chance to change it. Once the washer and dryer are set in the space on their pedestal, there will be no chance at a do-over.
I had a hard time settling on a color. I've been checking out a lot of trends on Pinterest.com and I've been seeing a lot of beach glass greens and blues. I like those colors, and the temptation was definitely there to make this little laundry closet light and airy. But I decided to push out of my comfort zone a little and be bold. I'm never disappointed when I choose a rich color and yet I usually have to talk myself into it. I ended up settling on a color called "Big Cypress" by Pittsburgh Paints. It is sort of a cinnamon copper color.
First things first, I decided to tape off a 4 inch section at the front of the walls. This is so that when the white bi-fold doors are closed on the closet you won't be able to see the cinnamon color around the edges. Next I painted up around the new light fixture. I found this one at Lowe's for $20. I really like it because the halogen lights are very bright and the track lights can be positioned to focus the light in front of the machines where I will be pre-treating spots in the laundry.
Next I painted all the walls. I am really liking the color and I think it will look great with the champagne colored appliances and black pedestal.
Still need to apply one more coat and paint the ceilings, put the face plates on the utility boxes, mop the floor and finish the pedestal before tomorrow afternoon. Tonight is football homecoming, but it is freezing cold so I'm bowing out on the festivities to get the painting done. Then later tonight Scott can thaw out under the lights after taking our kids to the game and finish everything else. Tomorrow both girls have activities so we won't have a chance to do any last minute details, it all needs to be done tonight. Getting closer though!
This morning I sanded the drywall that Scott touched up last night as well as the ceiling. Have I mentioned before that I really dislike sanding drywall? Because I do dislike it, a lot. Normally I wouldn't even touch the ceiling as anything over my head is out of my domain, but it was looking pretty good so I thought I'd give it a go and see if we were at the point of calling it done. Covered in drywall dust head to toe, I felt like the stay-puff marshmallow man.
Before we can paint the ceiling, we needed to try to match the knockdown texture. We did all the drywall when we built the house nine years ago, and in some places it looks great. In others you can observe our amateur status. We weren't pros at drywall but we were kind of forced to take that task on to get our budget back on track after the contractor (we shall call him Nimrod) 'forgot' to include the cost of trusses in his bid. Eliminating the labor expense on drywall was a big step toward recovering our budget. Not being pros, however, we weren't doing anything fancy on the ceilings. I know that the popcorn look would have been the most forgiving but it is also something people seem to loathe with a passion so we compromised with a knock down texture that would mask imperfections.
To blend the extended ceiling into the old, we were not about to go through the mess and expense of renting a professional sprayer. For such a small area we bought a can of spray-on ceiling texture and hoped it would work ok. Scott came home at lunch today and put the texture up while my primer dried so I could get two coats of paint on the walls today.
| ceiling texture spray |
I don't mind painting, but boring white primer and white semi-gloss on all the trim is getting old. White, white, give me color! I was dying to see if I liked the color I picked on the walls because if I didn't like it today was my one and only chance to change it. Once the washer and dryer are set in the space on their pedestal, there will be no chance at a do-over.
I had a hard time settling on a color. I've been checking out a lot of trends on Pinterest.com and I've been seeing a lot of beach glass greens and blues. I like those colors, and the temptation was definitely there to make this little laundry closet light and airy. But I decided to push out of my comfort zone a little and be bold. I'm never disappointed when I choose a rich color and yet I usually have to talk myself into it. I ended up settling on a color called "Big Cypress" by Pittsburgh Paints. It is sort of a cinnamon copper color.
First things first, I decided to tape off a 4 inch section at the front of the walls. This is so that when the white bi-fold doors are closed on the closet you won't be able to see the cinnamon color around the edges. Next I painted up around the new light fixture. I found this one at Lowe's for $20. I really like it because the halogen lights are very bright and the track lights can be positioned to focus the light in front of the machines where I will be pre-treating spots in the laundry.
![]() |
| lights off |
![]() |
| lights on |
Still need to apply one more coat and paint the ceilings, put the face plates on the utility boxes, mop the floor and finish the pedestal before tomorrow afternoon. Tonight is football homecoming, but it is freezing cold so I'm bowing out on the festivities to get the painting done. Then later tonight Scott can thaw out under the lights after taking our kids to the game and finish everything else. Tomorrow both girls have activities so we won't have a chance to do any last minute details, it all needs to be done tonight. Getting closer though!
12 inches equals 2 weeks
I so wish I was better about taking before pictures. I didn't get any of the laundry closet because, well, it was a closet. Soon it will be a thing of beauty. :)
Getting super fancy appliances meant expanding the space by another foot. We were able to bump the closet back into the master bedroom without causing any issues there. In addition to creating the extra space, we'd need to move the plumbing from the left side to the right side, move the dryer vent from the left side to the right side, as well as switch the electrical outlets for the dryer and washer.
The first couple evenings were spent on planning and disconnecting. All of the things that needed to be moved were in a tight space in the basement above the furnace ducts and cold air return. It was not going to be an easy project. Then came the demo. The back wall was there one day, gone the next. I walked in to find Scott standing in the master bedroom looking at the back side of the wall and he seemed to be in a relatively good mood. "Sometimes it is better to be lucky than good," he said. He explained that he'd forgot about the triangular shaped dead space that ran through the area where the spare bath, laundry closet, and master bedroom meet. (to see this on the plans go to this post and scroll down to alternate plan, it is located behind the dryer) Inside this space runs the venting for the upstairs plumbing and assorted wiring. Had this not been there, the venting would have come through the wall of the laundry closet and it would have been a HUGE hassle and expense to try to change it. Yay for luck!
While the wall was ripped out, he realized he this would be his only opportunity to fix a screw up in the spare bathroom that happened when we built the house. The light switch was placed on the wrong wall. We dealt with it by putting a door in that swung in the opposite direction, but it is awkward. As much as it didn't make sense to add to the amount of work this project already required, this really was the only opportunity to fix the blunder.
You can see that the door had to swing past the wall that bumps out next to the tub. Every time it passed, the door latch scraped the wall. The door should have swung in toward the tub, with the light switch on the opposite wall. Like it is now:
You can also see by the pictures that before we had to drop everything and work on the laundry closet, there was a lot of drywall repair going on in this bathroom. That's ok, the walls were filthy and I wasn't crazy about this color anyway.
Scott worked every evening after dinner until about 10pm. On the weekends, when we weren't at our daughter's games, picking up materials or eating meals, we were working. Delivery was set up for September 27th so we had 16 days. My birthday was the 25th and it was "celebrated" by working. There was simply no choice. Even then we were forced to admit that we'd have to push the delivery back. Another week of going to the laundromat for me.
Finally we were nearing completion. The drywall was up and a coat of mud was on. Hurray!
We were also lucky in that we had exactly enough tiles left over from the original construction to add one more row so we didn't have to change the floor. After installing we had just one tile left... until Scott dropped his level and cracked one of the new tiles. Now we have zero, so hopefully we won't ever need to make any other repairs!
Aside from the drywall and some copper and PVC fittings, we didn't have to buy much for this project. It was just a lot of work. Then waiting. Waiting for the mud to dry.
We should have bought quick set mud and mixed it. We didn't. *banging head*
All this work and I still don't know if we'll be done by tomorrow, October 1st, the new delivery date. Yesterday I sanded and primed the walls even though the ceiling still needed another coat of mud and the knockdown texture applied. This is my most recent photo:
Sorry it is so dark, the light was disconnected so this is the best I could do. On my way down right now to sand, prime, and paint some more. With any luck I'll be able to show you more progress tomorrow, and also show you the gorgeous stand we made for the washer and dryer.
Getting super fancy appliances meant expanding the space by another foot. We were able to bump the closet back into the master bedroom without causing any issues there. In addition to creating the extra space, we'd need to move the plumbing from the left side to the right side, move the dryer vent from the left side to the right side, as well as switch the electrical outlets for the dryer and washer.
The first couple evenings were spent on planning and disconnecting. All of the things that needed to be moved were in a tight space in the basement above the furnace ducts and cold air return. It was not going to be an easy project. Then came the demo. The back wall was there one day, gone the next. I walked in to find Scott standing in the master bedroom looking at the back side of the wall and he seemed to be in a relatively good mood. "Sometimes it is better to be lucky than good," he said. He explained that he'd forgot about the triangular shaped dead space that ran through the area where the spare bath, laundry closet, and master bedroom meet. (to see this on the plans go to this post and scroll down to alternate plan, it is located behind the dryer) Inside this space runs the venting for the upstairs plumbing and assorted wiring. Had this not been there, the venting would have come through the wall of the laundry closet and it would have been a HUGE hassle and expense to try to change it. Yay for luck!
While the wall was ripped out, he realized he this would be his only opportunity to fix a screw up in the spare bathroom that happened when we built the house. The light switch was placed on the wrong wall. We dealt with it by putting a door in that swung in the opposite direction, but it is awkward. As much as it didn't make sense to add to the amount of work this project already required, this really was the only opportunity to fix the blunder.
You can see that the door had to swing past the wall that bumps out next to the tub. Every time it passed, the door latch scraped the wall. The door should have swung in toward the tub, with the light switch on the opposite wall. Like it is now:
You can also see by the pictures that before we had to drop everything and work on the laundry closet, there was a lot of drywall repair going on in this bathroom. That's ok, the walls were filthy and I wasn't crazy about this color anyway.
Scott worked every evening after dinner until about 10pm. On the weekends, when we weren't at our daughter's games, picking up materials or eating meals, we were working. Delivery was set up for September 27th so we had 16 days. My birthday was the 25th and it was "celebrated" by working. There was simply no choice. Even then we were forced to admit that we'd have to push the delivery back. Another week of going to the laundromat for me.
Finally we were nearing completion. The drywall was up and a coat of mud was on. Hurray!
We were also lucky in that we had exactly enough tiles left over from the original construction to add one more row so we didn't have to change the floor. After installing we had just one tile left... until Scott dropped his level and cracked one of the new tiles. Now we have zero, so hopefully we won't ever need to make any other repairs!
Aside from the drywall and some copper and PVC fittings, we didn't have to buy much for this project. It was just a lot of work. Then waiting. Waiting for the mud to dry.
We should have bought quick set mud and mixed it. We didn't. *banging head*
All this work and I still don't know if we'll be done by tomorrow, October 1st, the new delivery date. Yesterday I sanded and primed the walls even though the ceiling still needed another coat of mud and the knockdown texture applied. This is my most recent photo:
Sorry it is so dark, the light was disconnected so this is the best I could do. On my way down right now to sand, prime, and paint some more. With any luck I'll be able to show you more progress tomorrow, and also show you the gorgeous stand we made for the washer and dryer.
Laundry Room - Urgent
The spontaneous combustion of our Maytag dryer created a new state of urgency. When the washer died, we had the one down at H2 to replace it with. We'd given the dryer away so there was no free fix this time. The washer was not one we wanted to keep anyway, it was a top loader that seems to devour clothing. All the edges of my towels are now shredded and frayed. Yeah, they are all 10 years old. But the one thing I can say about the Maytag Neptune washer is that when it was working, it worked fantastic. My old towels didn't look old until I started using this bottom of the line agitating top loader. Hate is not a word I toss around lightly, but yes, I hate that beast.
After I'd recovered from the dryer fire, I spent the rest of the day researching new appliances online. Well, there was a brief break in the action for dinner and a trip to the laundromat to dry the laundry that was in the dryer at the moment of ignition. Then there was the dilemma as to whether to put new appliances in H1, the house we're living in, or in H2, the house we hope to move into. Convenience aside, we didn't really want to install them here since we have already included the appliances in the sellers' agreement. Putting them in at H2 would involve some work, though. Let me explain...
When we built the house we followed the plans on the laundry area. We didn't catch the fact that modern appliances were not going to fit into a 30" deep closet. Most washers and dryers are pushing that depth without allowing for space to put hoses and cords or vent the dryer. Because of the shallow depth of the closet, we were never able to put on the bi-fold doors we'd purchased for the closet. They still sit in their packaging in the garage. We were definitely aware that it would be hard to find appliances for that space. We thought about moving the laundry into the spare bedroom and turning it into a laundry/craft area, but I hated the idea of giving up a bedroom. I tried searching for washers and dryers that were under 27" in hopes that there might be a front loading set that were not tiny apartment sized, but maybe taller or something.
Sears actually let me search by depth which is how I stumbled across this set:
| Read all the specs on this GE set HERE |
It was.
I did a little more digging and discovered that this set was actually 34 1/2" deep. Width for each is 27". Ah, gotta love a typo. While I was searching, I discovered that there were no reviews on this set. It must be very new. It is also super expensive- to the tune of $1499 each. Ouch! But then the google smiled on me and coughed up a price of $768 at AppliancesConnection.com (note- that is no longer their price, check for yourself). I showed my husband and he was intrigued. Mainly because we were hoping to spend around $650 each and this wasn't much more for a much, much higher valued appliance. Nearly half price!
The next day we stopped by Lowe's to see if they had this set in stock so we could look at them before ordering online. What we discovered when we were shopping is that front load washers are not designed to switch the door swing with the exception of Electrolux models. This posed a problem as our space was plumbed for the washer on the right. Appliance manufacturers think the washer should be on the left. The dryer doors can all be reversed, but you can't even special order a washer for most models with the opposite swing.
This little tidbit along with the complete lack of shallow dept front-loaders led us to acknowledge the fact that we were going to have to modify the laudry closet to accommodate any front-loading set. Lowe's did not have this exact set, they had a white version one step down for $1399. We liked it, thought all the features sounded fantastic and decided we'd order online. I was checking the model number against the AppliancesConnection.com website, just to be sure it was the same, when a sales man asked what I was looking up. I showed him my phone and he said, wow, that was a great deal. Jokingly, I said, "that isn't something you'd be interested in price matching, is it?" I was laughing when I said it. But said he didn't know but would take a look. I honestly expected him to laugh right along with me so imagine my surprise when he borrowed my phone and called a manager over to take a look.
Because of the drastic price difference, it wasn't a decision made quickly. But in the end, Lowe's did match the price. The gave us free delivery, too. They were not able to give us free sales tax, but we considered that a more than fair trade-off to be dealing with a local store and also get 6 months same as cash.
I am so stinking impressed with Lowe's and their commitment to price matching. The fact that this happened on our 17th wedding anniversary felt like a gift from God. Here you go- finally a matching set of appliances and they are even half price. :)
The joy lasted until U of M beat ND that night. For me anyway... my husband the Michigan fan was overjoyed. Me, not so much. That's ok, though. He got the win, but the reality of all the work that lay ahead to get ready for the washer and dryer would sink in the next day. The appliances were on order. He had 2 weeks. Could we do it? Could we make that deadline?
Thursday, September 29, 2011
The universe speaks
You know how sometimes you are going along, all fine in your own world with your own plan and you think you have a grip on things then suddenly it all comes to a screeching halt?
Well that was me, exactly 20 days ago. I mean, we'd just come off the whole 'hole in the floor' thing, but otherwise I felt like things were moving along. We had a few things to wrap up upstairs and then we'd start working on the main floor.
Remember how I said that we would need to do something with the laundry closet but that was low priority? Well, that became high priority really fast when our dryer decided to take up flame throwing as a hobby. I tossed a load of darks into my 5 year old Maytag Neptune dryer and pushed the start button.
So after a terrifying 15 minutes and a frantic call to my husband (did you turn the breaker off? No,will do that right now!), the smoke cleared and I was still alive. The dryer, however, was not. He came home from work, removed the electrical panel and determined that the fire had indeed burnt itself out. Every window and door was propped open to air out the house. Of course we had a showing the next day. Of course.
Our Maytag Neptune washer had died a few months before in a dramatic fashion, but not nearly as bad as this. We replaced it with the cheap top loader that was at H2 and it proceeded to eat my clothes at every opportunity. As washers go, it has an identity crisis. It thinks it is a vacuum. You know, because it sucks.
I spent the remainder of the day researching washers and dryers. I'll share that segment of the story in another post. We did send the photos off to Maytag and I need to tell you that they seem to agree that this electrical fire should not have happened. They are buying the machine back from us (at about a third of the original cost) and have arranged with a local appliance store to bring us a check and pick it up so their safety department can investigate it. I have to say I'm good with this- they could have told us sorry, warranty has expired, you're out of luck. Instead they have taken this complaint seriously and are taking measures to rectify it.
*cue the record player needle scraping across the vinyl sound*
**if you don't have a clue what that means then you are just a baby-
go get your iPod and take a nap while I rant**
Well that was me, exactly 20 days ago. I mean, we'd just come off the whole 'hole in the floor' thing, but otherwise I felt like things were moving along. We had a few things to wrap up upstairs and then we'd start working on the main floor.
***I feel the need to insert screech noise again***
Remember how I said that we would need to do something with the laundry closet but that was low priority? Well, that became high priority really fast when our dryer decided to take up flame throwing as a hobby. I tossed a load of darks into my 5 year old Maytag Neptune dryer and pushed the start button.
Bbbzzzzzzzztt!
Flames! Flames licking around the powdered detergent box and softener sheets. Shit! TurnPowerOff! Stick hand right over FLAMES and turn it OFF. O.F.F.
Smoke, oh, lord and the popping and sizzling. Black thick smoke. Shit!
So after a terrifying 15 minutes and a frantic call to my husband (did you turn the breaker off? No,will do that right now!), the smoke cleared and I was still alive. The dryer, however, was not. He came home from work, removed the electrical panel and determined that the fire had indeed burnt itself out. Every window and door was propped open to air out the house. Of course we had a showing the next day. Of course.
![]() |
| Blue flames came shooting out the gap where the control panel meets the top of the dryer. |
![]() |
| The fried electrical panel. |
![]() |
| Melted. |
I spent the remainder of the day researching washers and dryers. I'll share that segment of the story in another post. We did send the photos off to Maytag and I need to tell you that they seem to agree that this electrical fire should not have happened. They are buying the machine back from us (at about a third of the original cost) and have arranged with a local appliance store to bring us a check and pick it up so their safety department can investigate it. I have to say I'm good with this- they could have told us sorry, warranty has expired, you're out of luck. Instead they have taken this complaint seriously and are taking measures to rectify it.
Subscribe to:
Posts (Atom)