Today I spent my day working on the hall of doors.
From this angle, you can see 4 of the 6 doors in this hall.
All of them need to be painted. 3 coats on each side of the door, plus door frames. That would be a total of 36 coats of white semi-gloss paint on these doors. I think. If my math skills are a little fuzzy it is because I've been in white semi-gloss hell all day and everything is a shiny white blur.
This is taken from the opposite direction in the spare bathroom's doorway. The pantry door is to the right, which you can't see here. Straight out in front on the right are (closest to farthest) basement, linen closet, spare bedroom/studio. On the left is the master bedroom. You can just see the edge of the dryer there on the left. Know what that means? After all these doors are painted and the new flooring is installed, we'll put up the bifold doors that go on the laundry closet and I'll have more doors to paint.
Oh, joy.
I've come to both love and loathe white semi-gloss. Nothing freshens up a room more than having a new coat of white paint on the trim. It screams clean and neat, even if everything else in the room does not. But the actual painting of white semi-gloss? Oh lord help me.
b...o...r...i...n...g...
My mind is screaming for color and fun and-
and I still have 21 coats to go.
Not counting the laundry doors.
Blech.
btw- that blue is not staying. I can't wait to cover the blue. It bugs me in a way I really can't even explain, nearly inciting me to violence. I know, it seems like such a tranquil color. But I despise it and soon it will be erased by either something linen or sand or whatever fancy name for beige. Which is really sad. I mean, what does it say about my current state when beige is something exciting???
Friday, November 18, 2011
Thursday, November 10, 2011
Spare Bathroom -so far
It isn't quite done, but I thought I'd give you a little teaser on the spare bathroom. If we work hard, I think it is realistic to expect this to be done by the end of the weekend. Yay!
What we've done so far... I mentioned that the electrical had to be redone when we were expanding the laundry closet. This left us with a big hole in the wall that had to be repaired. Fixing the electric meant changing the door swing to the place it was originally intended, which meant removing the existing door and replacing with a new one. The bead board glue had come loose so it needed to be fastened to the wall again. This time we used nails. The ceiling had an area that needed to be repaired, plus it needed to be repainted and of course, cleaned thoroughly.
I've got to the point of painting the walls with primer and 2 coats of paint. I still see a few touch ups, plus the trim and ceiling still need to be painted. The floor will need to be re-grouted before we put down the floor trim, and we still need to install the new door. But we have made a lot of progress.
The old, very bold turquoise color-
The new colors-
I took one pic with the light on and one with the light off. On the right with the light off is a truer depiction of the yellow color. It is actually the same shade of yellow in the great room of our current home, Behr's Calm Air. The gray aqua color is Behr's Contemplation. Calm Air and Contemplation- good names for a bathroom, don't you think?
There is a tall white cabinet that fits in to the left of the pedestal sink. That has been removed while we work but will be replaced soon. The pedestal will be fitted properly back under the sink and the tank will be put back on the toilet. It is all a process, but I wanted to show you that we have really started work on the main floor.
What we've done so far... I mentioned that the electrical had to be redone when we were expanding the laundry closet. This left us with a big hole in the wall that had to be repaired. Fixing the electric meant changing the door swing to the place it was originally intended, which meant removing the existing door and replacing with a new one. The bead board glue had come loose so it needed to be fastened to the wall again. This time we used nails. The ceiling had an area that needed to be repaired, plus it needed to be repainted and of course, cleaned thoroughly.
I've got to the point of painting the walls with primer and 2 coats of paint. I still see a few touch ups, plus the trim and ceiling still need to be painted. The floor will need to be re-grouted before we put down the floor trim, and we still need to install the new door. But we have made a lot of progress.
The old, very bold turquoise color-
The new colors-
There is a tall white cabinet that fits in to the left of the pedestal sink. That has been removed while we work but will be replaced soon. The pedestal will be fitted properly back under the sink and the tank will be put back on the toilet. It is all a process, but I wanted to show you that we have really started work on the main floor.
Tuesday, November 8, 2011
DIY How to Remove Wallpaper Border
How do you feel about wallpaper? Seems like a polarizing question- people love it or hate it. I'm not terribly fond of it, however I have used it, especially decorative borders to easily add a design element to a room. My dislike of wallpaper originated in the first house my husband and I owned. When we bought it, we didn't realize that the garish Teenage-Mutant-Ninja-Turtle-Green paint in the previous owners' son's bedroom wasn't just painted walls. It was actually painted wallpaper. Since we were new to the whole renovation thing, we were adamant that we were going to do it "right." Which meant stripping the wallpaper down to the plaster and painting.
Well.
That was a noble idea, but we soon realized that there were more layers of wallpaper than the one that was covered by the very bold green. Five layers in one bedroom. Six layers in the other. In both rooms the paint covered the ceilings. Oye. What started as a simple paint job turned into two weeks using a hot, heavy steamer during one of the hottest summers on record in a non-air-conditioned house. Picture steaming hot water dripping down your arms and face as you hold a steamer over your head for HOURS, hundred degree heat, scraping one foot sections off at a time. Decades-old wallpaper landing in your hair, old glue sticking to your face. After stripping off all that wallpaper I vowed to myself NEVER AGAIN. I would never use wallpaper. NEVER.
It is easy to understand, then, why I loathe wallpaper. Except sometimes it really does add just the right touch. The spare bedroom that is going to be my studio's new home was previously used as a little grandmother's sewing room. When we built the house I found a vintagey sewing border and thought it was perfect. With a new purpose, it is time to remove the border. Fortunately I know the walls are sound underneath and this border isn't hiding any of the things wallpaper is often used to mask. If you've never removed wallpaper, stripping it can be easy or difficult, depending on the adhesive that was used to apply it. Most readily available modern wallpapers are vinyl coated so the first thing you want to do is try to peel off that top layer.
I work in small sections, maybe 4' or 5' at a time with border, smaller if I'm doing larger pieces of wallpaper. Let the DIF set for about 10 minutes and then see if it is ready with a plastic scraper.
You can see my scraper has seen some use over the 20 odd years I've had it! I use kind of an arcing motion to scrape the paper off the walls. It should come up easily, if it doesn't, you may need to use a wet sponge to re-wet the area and spray a little more DIF. When it is going well, the paper will come off in nice sheets just like the vinyl, although you will have to use the scraper underneath almost the entire surface.
Once all the paper is off, use fresh warm water and a clean sponge to remove the remaining glue residue. If there are any nail holes, be sure to spackle and sand, then you'll be ready to primer and apply a fresh coat of paint.
Removing the wallpaper border in this room took approximately half an hour. As I said, with the right technique and tools, and newer wallpaper, this process doesn't have to be brutal. If your wallpaper is a century old, though, as it was in my first house- well, I wish you a little luck and a lot of patience. On the bright side, two weeks of steaming could land you some nice triceps!
Well.
That was a noble idea, but we soon realized that there were more layers of wallpaper than the one that was covered by the very bold green. Five layers in one bedroom. Six layers in the other. In both rooms the paint covered the ceilings. Oye. What started as a simple paint job turned into two weeks using a hot, heavy steamer during one of the hottest summers on record in a non-air-conditioned house. Picture steaming hot water dripping down your arms and face as you hold a steamer over your head for HOURS, hundred degree heat, scraping one foot sections off at a time. Decades-old wallpaper landing in your hair, old glue sticking to your face. After stripping off all that wallpaper I vowed to myself NEVER AGAIN. I would never use wallpaper. NEVER.
It is easy to understand, then, why I loathe wallpaper. Except sometimes it really does add just the right touch. The spare bedroom that is going to be my studio's new home was previously used as a little grandmother's sewing room. When we built the house I found a vintagey sewing border and thought it was perfect. With a new purpose, it is time to remove the border. Fortunately I know the walls are sound underneath and this border isn't hiding any of the things wallpaper is often used to mask. If you've never removed wallpaper, stripping it can be easy or difficult, depending on the adhesive that was used to apply it. Most readily available modern wallpapers are vinyl coated so the first thing you want to do is try to peel off that top layer.
This can actually be sort of fun. Kind of reminds me of peeling off skin after a sunburn, trying to see how long of a piece you can pull off at once. Pull with a slow, steady tug to maximize the length and minimize your efforts.
Sometimes you'll have wallpaper which refuses to give up the top layer. In that case you'll have to score the surface with a tool called a tiger tail. It is just a plastic disc with what looks like toothy gears underneath that you swirl over the wallpaper to help the hot water and chemical release penetrate to the paper underneath.
Since I was able to peel off almost all the vinyl, I was left with just the glued paper backing. Using a sponge and warm water, I like to get the paper wet before using any chemicals. It doesn't need to be so saturated that it drips down the walls, but you do want to make sure the surface is completely damp because it will make the chemical stripper work better and faster.
Next, spray the paper with a chemical stripper. I personally like this DIF spray. This bottle has lasted me through at least 5 stripping projects and 9 years. I consider it a bargain! It goes a long way when you remove the vinyl and wet the paper first, and it is still just as fast and effective as it was when new.
Gosh, now that I'm boasting on it, I hope it is still available. The gel spray is nice because it doesn't drip down the walls. It stays where you spray it and makes the whole process much less messy than steamers or liquids.
You can see my scraper has seen some use over the 20 odd years I've had it! I use kind of an arcing motion to scrape the paper off the walls. It should come up easily, if it doesn't, you may need to use a wet sponge to re-wet the area and spray a little more DIF. When it is going well, the paper will come off in nice sheets just like the vinyl, although you will have to use the scraper underneath almost the entire surface.
Once all the paper is off, use fresh warm water and a clean sponge to remove the remaining glue residue. If there are any nail holes, be sure to spackle and sand, then you'll be ready to primer and apply a fresh coat of paint.
Removing the wallpaper border in this room took approximately half an hour. As I said, with the right technique and tools, and newer wallpaper, this process doesn't have to be brutal. If your wallpaper is a century old, though, as it was in my first house- well, I wish you a little luck and a lot of patience. On the bright side, two weeks of steaming could land you some nice triceps!
New Studio
I'm sure I've mentioned this, but H2 is a four bedroom home. Our family of four will only need three of those bedrooms, which leaves the smallest bedroom as a bonus room. What to do with it?
The obvious options are guest room or home office. It was previously used as a sewing room, so any sort of crafting space would work as well. Since I work from home making jewelry and other assorted projects, I've decided this will be the perfect spot for my new studio.
Currently, it is storing all the things that used to be in my studio, a space about 6 times larger than this room.
Bedroom #4 circle tour... ignore the mess! The window looks out onto the covered porch and front yard. Moving to the right, there is a wall about 6' long. On a slight angle, the next wall comes in. Then the door to the hall, followed by a large closet with bifold doors.
My previous studio was in the downstairs of our walkout ranch, all the way back. It had a cement floor that had been painted to look like slate tiles which was very convenient for a studio, especially when I was making stained glass. But as my projects changed and our family grew, it turned into a large storage room and was kind of cold what with being downstairs and having a cement floor. I want something just as functional and easy to clean, but also more of a show room where I can bring clients and also a cozy place to work. I want to have my computer handy and incorporate a shipping station so I can package items without leaving my space to fetch boxes or tape.
I can't get too carried away yet as we will most likely be stealing some space from this room for the master bathroom. We plan to revert to the original house plans and use about half of this room's closet for the master bathroom's shower. Flooring won't be installed until we do the entire lower level. However this is the one room that pets really weren't allowed which is why it was the first place we used for storage. What I can do is paint, install wall cabinets, and start organizing my studio so that I don't have to continue turning away business. Not to mention freeing up the floor space by finding a home for all of my supplies.
Currently we have three rooms going simultaneously, so the progress happens in fits and starts. After making a plan for this room, the only thing I've done is remove the wallpaper border. The next step is to remove the baseboards and primer, then paint. Finally, I'll refinish the cabinets that are going in this room and mount the wall cabinets. They will be going on that 6' wall. This should leave me with enough room to use a large table in the center of the room as a layout area. I plan to find a cushy chair on casters that can serve as seating at the table or rotated 180 degrees, work at the counter space on the cabinet wall.
Originally, I had a plan to paint the walls a dusty grayish mauve color, then put both a chocolate and a white glaze on maple cabinets. Curtains and art would be shades of white, cream, and beige. Think Ballard Designs. I have two off-white media cabinets which I planned to put in here, repurposed for storing supplies and finished jewelry. Then I saw a couple 2012 trend ideas that I really liked. One had plum colored walls and the other a rich emerald. Both used distressed black furniture/cabinets and chandeliers, very gothic looking. I have to say, both rooms grabbed my attention and I thought, "I want to go there!" Which makes me wonder if it is time to tap into the dark side, create a space that feels more like a creative cocoon than floating on a cloud. This is my space and the only things that are set in stone are the window and white trim. After that, anything goes. What do you like better? Leave a comment and give me your vote- gothic or ethereal.
The obvious options are guest room or home office. It was previously used as a sewing room, so any sort of crafting space would work as well. Since I work from home making jewelry and other assorted projects, I've decided this will be the perfect spot for my new studio.
Currently, it is storing all the things that used to be in my studio, a space about 6 times larger than this room.
Bedroom #4 circle tour... ignore the mess! The window looks out onto the covered porch and front yard. Moving to the right, there is a wall about 6' long. On a slight angle, the next wall comes in. Then the door to the hall, followed by a large closet with bifold doors.
My previous studio was in the downstairs of our walkout ranch, all the way back. It had a cement floor that had been painted to look like slate tiles which was very convenient for a studio, especially when I was making stained glass. But as my projects changed and our family grew, it turned into a large storage room and was kind of cold what with being downstairs and having a cement floor. I want something just as functional and easy to clean, but also more of a show room where I can bring clients and also a cozy place to work. I want to have my computer handy and incorporate a shipping station so I can package items without leaving my space to fetch boxes or tape.
I can't get too carried away yet as we will most likely be stealing some space from this room for the master bathroom. We plan to revert to the original house plans and use about half of this room's closet for the master bathroom's shower. Flooring won't be installed until we do the entire lower level. However this is the one room that pets really weren't allowed which is why it was the first place we used for storage. What I can do is paint, install wall cabinets, and start organizing my studio so that I don't have to continue turning away business. Not to mention freeing up the floor space by finding a home for all of my supplies.
Currently we have three rooms going simultaneously, so the progress happens in fits and starts. After making a plan for this room, the only thing I've done is remove the wallpaper border. The next step is to remove the baseboards and primer, then paint. Finally, I'll refinish the cabinets that are going in this room and mount the wall cabinets. They will be going on that 6' wall. This should leave me with enough room to use a large table in the center of the room as a layout area. I plan to find a cushy chair on casters that can serve as seating at the table or rotated 180 degrees, work at the counter space on the cabinet wall.
Originally, I had a plan to paint the walls a dusty grayish mauve color, then put both a chocolate and a white glaze on maple cabinets. Curtains and art would be shades of white, cream, and beige. Think Ballard Designs. I have two off-white media cabinets which I planned to put in here, repurposed for storing supplies and finished jewelry. Then I saw a couple 2012 trend ideas that I really liked. One had plum colored walls and the other a rich emerald. Both used distressed black furniture/cabinets and chandeliers, very gothic looking. I have to say, both rooms grabbed my attention and I thought, "I want to go there!" Which makes me wonder if it is time to tap into the dark side, create a space that feels more like a creative cocoon than floating on a cloud. This is my space and the only things that are set in stone are the window and white trim. After that, anything goes. What do you like better? Leave a comment and give me your vote- gothic or ethereal.
Wednesday, November 2, 2011
Desk makeover
One of the items that happened to be in the garage at H2 was my husband's childhood desk. It was given to him by his aunt. I think our niece used it as well, but the desk itself was showing it's age. This is a picture of how it started:
Ok, that isn't exactly how it started. There were three wooden knobs and the top wasn't sanded. Two of the drawers had missing backs and two of the wood pieces that support the drawers had fallen off. But you get the idea, it was in rough shape. My daughter saw the potential, though, and wanted this painted green for her bedroom. On the whole, it was a pretty easy and fast refinish.
You might be able to see that I distressed the edges slightly with a sander. This brings up a faint white line from the primer and gives this simple piece a little dimension and enhances the fact that it is a vintage desk. I put several coats of Minwax finishing wax over the top surface to give it some protection. I didn't bother with the sides because as you can tell, noting can really touch them in this location.
Give me your thoughts! Makeover success?
Ok, that isn't exactly how it started. There were three wooden knobs and the top wasn't sanded. Two of the drawers had missing backs and two of the wood pieces that support the drawers had fallen off. But you get the idea, it was in rough shape. My daughter saw the potential, though, and wanted this painted green for her bedroom. On the whole, it was a pretty easy and fast refinish.
First things first, there was a spot on the top corner I had to patch with wood filler. This stuff is really stiff, but works well. This is what it looked like after it was filled but before I sanded it down-
I used a palm sander to sand the entire finish off the desk. I'm not sure of the wood, perhaps mahogany or cherry. The wood was red straight through so it wasn't simply a stain. After sanding-
Next, I rolled primer on. With all the primer options, I'll be honest. I rolled on the Zinsser primer we happened to have. It did not list bare wood on the label, but I ignored this. It took 3-4 coats of primer to completely mask all of the wood. Three for most of the desk, four for the drawer faces and top because they are the most visible surfaces.
I didn't think to take a picture of it after priming, basically picture it white. I had planned to have paint mixed to the right shade of green and roll it on, but happened to see a can of Rustoleum brand paint in nearly the exact shade of green my daughter picked out. I put about 4 coats on which required all of one and part of another 2X (twice the coverage) cans.
Since I already had these knobs leftover from an old loft bed, we decided to reuse them. You can see two are missing, that is because two of the screws that were with the knobs were too short.
The desk fits perfectly into her dormer. As in, an inch more and it wouldn't have worked.
I promised I'd show you how the top came out. The bad spot was right above this heart sticker. Can't even tell now, can you? That wood filler has probably saved us $500 in doors that my husband has been able to salvage instead of replace. The door jambs in nearly every interior door have been clawed to bits by cats. Like the surface of the desk, however, once they have been filled, sanded, primed and painted, you would never know.
You might be able to see that I distressed the edges slightly with a sander. This brings up a faint white line from the primer and gives this simple piece a little dimension and enhances the fact that it is a vintage desk. I put several coats of Minwax finishing wax over the top surface to give it some protection. I didn't bother with the sides because as you can tell, noting can really touch them in this location.
Give me your thoughts! Makeover success?
Wednesday, October 26, 2011
Lots of half-done stuff
I've hesitated to blog about H2 recently because frankly, there isn't any single project which is all done for me to show off. I have several that are almost done, and one that is done but I haven't photographed, so it seems a little blah to give half an update on a bunch of stuff. But you know what? That's exactly what I'm going to do anyway. Here goes-
The bed transformation is almost done...
This was an old waterbed that had a dark pine finish. My oldest daughter decided she wanted it because it has six drawers underneath which appeal to her hoarder instincts. We will use it as a platform bed with a regular mattress. The bed frame was sanded, primed and painted black, then I applied 2 coats of Finishing Wax to give it a hand-rubbed finish. Oh, the misery that waxing is for my shoulder. But it looks really nice except for a small spot on the headboard. I was painting in the sun and the paint was drying too fast (that happens with black paint, even though the air temperature wasn't hot the painted surface was). I tried to sand out the bubble and re-paint, but it still looks bad. I'm going to sand down the entire top again and start over. I've been told that I'm being too picky, but after hand-rubbing this thing twice, I am not about to be lazy now and live with that imperfection right on the headboard. Those engraved flowers will probably be painted pink. At the very least I'll put a pink glaze in the crevices, still deciding on that.
The desk transformation is done, but I don't have finished photos yet.
This was my husband's desk when he was a child. It had several broken spots and he thought it should go straight out to the burn pile. But my youngest daughter liked it, and I liked the size and the many drawers. We measured her dormer and this fits perfectly in that space, less than half an inch on either side. I knew it could be cute when I was done and it is, can't wait to show it off.
The decoration above the laundry station is finished:
I vaguely remember typing up the entry on this but I don't think I had a completed photo. It is composed of a vintage window frame I'd bought at a salvage yard years ago and some honeysuckle vines I had in the garage. I used the honeysuckle about 10 years ago as garland on a Christmas tree. Since then I've picked at the coil I saved for projects here and there. The vines were secured into a loose wreath shape with taped wires (as in florist's tape). I used brown tape so the wires basically disappear.
We finished my oldest daughter's walk-in closet and it is now ready for her to start hanging clothes. It is just white wire shelving/rods that was left over from other projects. It turned out really nice, though, and I think it utilizes the space extremely well for a bunch of scraps.
The main floor bathroom has had lots of drywall patching. It needs another sanding and finish coat. After that is done we need to paint it, put the utility cabinet back in place, re-grout the tile, and replace the shower faucet and curtain rod.
On the other side of the laundry closet is the master bedroom. We need to drywall that side of the wall from where we expanded the laundry area and then the entire room needs to be painted. It doesn't have any flooring so before we can occupy it we'll need to decide whether it is getting hardwood or carpet. I think we might have to flip a coin as I want hardwood, my husband prefers carpet in a bedroom.
We still have a long way to go and right now it is a bit of a mess down there. However we are having an open house at H1 next weekend and we'd still like to sell it by the end of the year so we need to keep plugging away if we are to move into a finished home instead of a construction zone!
The bed transformation is almost done...
This was an old waterbed that had a dark pine finish. My oldest daughter decided she wanted it because it has six drawers underneath which appeal to her hoarder instincts. We will use it as a platform bed with a regular mattress. The bed frame was sanded, primed and painted black, then I applied 2 coats of Finishing Wax to give it a hand-rubbed finish. Oh, the misery that waxing is for my shoulder. But it looks really nice except for a small spot on the headboard. I was painting in the sun and the paint was drying too fast (that happens with black paint, even though the air temperature wasn't hot the painted surface was). I tried to sand out the bubble and re-paint, but it still looks bad. I'm going to sand down the entire top again and start over. I've been told that I'm being too picky, but after hand-rubbing this thing twice, I am not about to be lazy now and live with that imperfection right on the headboard. Those engraved flowers will probably be painted pink. At the very least I'll put a pink glaze in the crevices, still deciding on that.
The desk transformation is done, but I don't have finished photos yet.
This was my husband's desk when he was a child. It had several broken spots and he thought it should go straight out to the burn pile. But my youngest daughter liked it, and I liked the size and the many drawers. We measured her dormer and this fits perfectly in that space, less than half an inch on either side. I knew it could be cute when I was done and it is, can't wait to show it off.
The decoration above the laundry station is finished:
I vaguely remember typing up the entry on this but I don't think I had a completed photo. It is composed of a vintage window frame I'd bought at a salvage yard years ago and some honeysuckle vines I had in the garage. I used the honeysuckle about 10 years ago as garland on a Christmas tree. Since then I've picked at the coil I saved for projects here and there. The vines were secured into a loose wreath shape with taped wires (as in florist's tape). I used brown tape so the wires basically disappear.
We finished my oldest daughter's walk-in closet and it is now ready for her to start hanging clothes. It is just white wire shelving/rods that was left over from other projects. It turned out really nice, though, and I think it utilizes the space extremely well for a bunch of scraps.
The main floor bathroom has had lots of drywall patching. It needs another sanding and finish coat. After that is done we need to paint it, put the utility cabinet back in place, re-grout the tile, and replace the shower faucet and curtain rod.
On the other side of the laundry closet is the master bedroom. We need to drywall that side of the wall from where we expanded the laundry area and then the entire room needs to be painted. It doesn't have any flooring so before we can occupy it we'll need to decide whether it is getting hardwood or carpet. I think we might have to flip a coin as I want hardwood, my husband prefers carpet in a bedroom.
We still have a long way to go and right now it is a bit of a mess down there. However we are having an open house at H1 next weekend and we'd still like to sell it by the end of the year so we need to keep plugging away if we are to move into a finished home instead of a construction zone!
Tuesday, October 4, 2011
Laundry Pedestal How-to
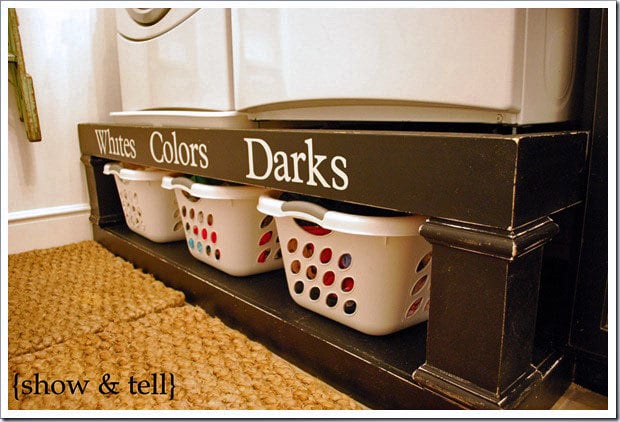
When I first caved to the cool-kid peer pressure and ventured on over to pinterest.com, one of the first things that caught my eye was this gorgeous laundry pedestal.
| See lots more amazing stuff at the Show & Tell blog! |
1) I have since become a Pinterest addict.
2) Love, LOVE this laundry pedestal.
3) Free plans? This is what it so great about the internet- people sharing things for free.Thank you, Ana White!
4) Don't I have those exact laundry baskets?
5) Honey, the gift guide says 17th anniversary should be furniture...
Remember this picture?
Well those 2x4's became my version of this pedestal.
Once we started looking at the dimensions of the plans vs. our space, it was clear that we wouldn't be able to accommodate three baskets under the washer and dryer. This bummed me out because I liked the symmetry of three, not to mention the wording. Lights and Darks kind of loses something. I tried to come up with a clever way of wording that, but decided I didn't want to just be clever. I wanted it to be functional and dividing my laundry into two baskets just wasn't going to work.
I also discovered that my existing baskets were a hair too tall.
One day I was stolling through Walmart and my eyes landed on these:
Do you see the rounded triangles of the baskets? Don't they look a bit like the doors on the washer and dryer?
The baskets were even a beige color, similar to the champagne appliances. I decided to invest in two new baskets and worry about wording later.
I painted all the boards before my husband started cutting and assembling, one coat of primer and two coats of black semi-gloss paint. A couple ways we deviated from the original plans-
![]() |
| using a level to help locate the studs to screw the top on. |
We assembled the top and the bottom but didn't connect the two by screwing in the bottom to the 4x4's until I'd had a chance to distress and wax the surface. I used a palm sander and lightly hit the edges of all visible surfaces. Then I used two coats of Minwax Finishing Wax to give it more of a hand-rubbed look and help protect the painted surface.
Now it looks like this:
I have decided to steal space in a nearby linen closet to store three more baskets. My laundry gets sorted into 5 different colors each week (an entire load of pink and one of dark purple/red) so having access to 5 baskets will be the most convenient. To finish off the pedestal, I am having Scott cut out vinyl letters for me at work. The letters will be white and spell out "Chambre de Blanchisserie" which I hope is French for Laundry Room.
Unless you have a better suggestion? I'd love comments with other ideas!
Revamping an old window
I mentioned that my inspiration for my laundry closet came from the Show & Tell blog, which I spotted originally on Pinterest.com. My closet is no where near as large as the laundry room pictured there but it was the inspiration for the pedestal with laundry basket storage underneath that Scott made and I also really liked the old door on the wall with a wreath. I don't happen to have an old door laying around, but I do have an old window. In my scaled-down version of this laundry area, I think that the window will be perfect. I even have some old honeysuckle vine out in the garage that I plan to use to make a wispy wreath.
I see a lot of people showing off their old windows so I thought I focus on telling you what I do to clean them up. This particular old window is one that I purchased at Heritage Architectural Supply, a place that specializes in pieces and parts of old buildings. You will pay more for mantles, corbels, doors and windows at a salvage place such as this than you would at a garage sale, but it is pretty much guaranteed instant gratification. About 13 years ago, when I was doing stained glass, I bought several old windows to put newly made stained glass panels in. This one I always liked so I didn't use it for a project to sell. It was just collecting dust in the garage, so I'm happy to finally give it new life.
As you can see, this window was missing one pane of glass. I could have tried to replace it, but instead I decided to remove all the glass and make the frame just a little lighter weight for hanging. I don't want the glare from the lights on the glass and I don't want them looking dusty from the lint that would likely collect on it over time. Because it is kind of a tight squeeze over the washer and dryer, once this is in place it will stay there for a good long while.
There are a couple precautions you need to consider when removing glass from an old frame. First, obviously, you don't want to get cut. The other consideration is lead. I can pretty much guarantee you that if your window looks like mine, it was painted with lead-based paint. Because of that, take some time to research safe handling of lead-painted items. Do not grab a palm sander and start sanding away at the finish without learning about the dangers of breathing in lead dust. I'm not an expert by any means, but I do take lead poisoning seriously.
To remove the glass I used:
cardboard box
gloves
old rag
hammer
standard head screwdriver
Closed-toed shoes and safety glasses would be a good idea
Damp disposable rag
Matte finish polyurethane spray
The safest way to remove the glass is to break it over a disposable cardboard box. Do this in an area where your family won't be walking barefoot as there may be glass shards that don't land in the box. Place the frame over the box and lay an old rag over the top of the glass. Give the glass a good whack in one of the corners. Chances are good that it will shatter, a few pieces will drop but some huge razor sharp shards will remain, especially if the glazing around the edges is still pretty strong. You'll need to wear gloves so you can gently break all the glass out of the window.
Any small shards that remain will need to be broken out using the screwdriver. Tap it along the groove on all sides to get any remaining pieces dislodged. You may find glazier's points, small metal tips that were used to hold the glass next to the wood. Knock these out with the tip of the screwdriver. These are sharp, just like the glass, so it is important to wear heavy gloves at all times.
After the glass is removed, use a damp disposable rag to wipe down the frame. This will remove any dust and cobwebs as well as tiny bits of glass that might remain. Being damp, the rag is less likely to disturb any lead in the paint of the window, but just in case throw the rag away when you are done. At this time you can paint your window with latex primer and paint or else seal the surface with a matte finish polyurethane. It is important to finish it as you want to seal in any lead so that it doesn't shed any lead-laced dust inside your home. I went the clear poly route because I love the chippy wood that has accents of a spice and pale aqua.
This is how it looks above the washer and dryer now, topped with some honeysuckle vine that was loosely wired into a wreath:
Here's a close up of that glorious chippy texture.
By the way, the wall color in the laundry closet is Pittsburgh Paint's Big Cypress. I decided on that color before I pulled the window frame out of the dusty corner in the garage. I was amazed at just how close a match the color is, I wasn't trying to match. But once I saw it, I used the grayish aqua color on the frame to help inspire the spare bathroom, which is the room immediately to the left of the laundry closet. That color also happens to be just a shade or two lighter than the shower curtain that is going in the spare bathroom. I love it when things randomly come together like that!
I see a lot of people showing off their old windows so I thought I focus on telling you what I do to clean them up. This particular old window is one that I purchased at Heritage Architectural Supply, a place that specializes in pieces and parts of old buildings. You will pay more for mantles, corbels, doors and windows at a salvage place such as this than you would at a garage sale, but it is pretty much guaranteed instant gratification. About 13 years ago, when I was doing stained glass, I bought several old windows to put newly made stained glass panels in. This one I always liked so I didn't use it for a project to sell. It was just collecting dust in the garage, so I'm happy to finally give it new life.
As you can see, this window was missing one pane of glass. I could have tried to replace it, but instead I decided to remove all the glass and make the frame just a little lighter weight for hanging. I don't want the glare from the lights on the glass and I don't want them looking dusty from the lint that would likely collect on it over time. Because it is kind of a tight squeeze over the washer and dryer, once this is in place it will stay there for a good long while.
There are a couple precautions you need to consider when removing glass from an old frame. First, obviously, you don't want to get cut. The other consideration is lead. I can pretty much guarantee you that if your window looks like mine, it was painted with lead-based paint. Because of that, take some time to research safe handling of lead-painted items. Do not grab a palm sander and start sanding away at the finish without learning about the dangers of breathing in lead dust. I'm not an expert by any means, but I do take lead poisoning seriously.
To remove the glass I used:
cardboard box
gloves
old rag
hammer
standard head screwdriver
Closed-toed shoes and safety glasses would be a good idea
Damp disposable rag
Matte finish polyurethane spray
The safest way to remove the glass is to break it over a disposable cardboard box. Do this in an area where your family won't be walking barefoot as there may be glass shards that don't land in the box. Place the frame over the box and lay an old rag over the top of the glass. Give the glass a good whack in one of the corners. Chances are good that it will shatter, a few pieces will drop but some huge razor sharp shards will remain, especially if the glazing around the edges is still pretty strong. You'll need to wear gloves so you can gently break all the glass out of the window.
Any small shards that remain will need to be broken out using the screwdriver. Tap it along the groove on all sides to get any remaining pieces dislodged. You may find glazier's points, small metal tips that were used to hold the glass next to the wood. Knock these out with the tip of the screwdriver. These are sharp, just like the glass, so it is important to wear heavy gloves at all times.
![]() |
| Those little metal wedges are glazier's points. |
This is how it looks above the washer and dryer now, topped with some honeysuckle vine that was loosely wired into a wreath:
Here's a close up of that glorious chippy texture.
By the way, the wall color in the laundry closet is Pittsburgh Paint's Big Cypress. I decided on that color before I pulled the window frame out of the dusty corner in the garage. I was amazed at just how close a match the color is, I wasn't trying to match. But once I saw it, I used the grayish aqua color on the frame to help inspire the spare bathroom, which is the room immediately to the left of the laundry closet. That color also happens to be just a shade or two lighter than the shower curtain that is going in the spare bathroom. I love it when things randomly come together like that!
Laundry room reveal
Are you ready?!
We managed to get everything done in time. Friday night when Scott came home he had painted the ceiling and finished assembling the pedestal so it was ready to go. Lowe's gave us a time between noon and 2:00 which worked out well for our kids' sports schedules. We had a cross country invitational in the morning, 45 minutes away at 9 am. Our cheerleader didn't have to be at her game until 1:30pm but it was local. Lowe's arrived shortly after noon and finished installing in time for all of us to head off to her game.
A friend of ours had a daughter on the opposing team's cheer squad so we decided to take in a late lunch at Pizza Hut together before making a quick Home Depot run. I had left H2 to help my daughter get her hair done for cheering so at this point I hadn't even seen the appliances in place. Scott told me that everything worked great but when the washer was going he had a small leak in the basement. He needed to replace a fitting and it would be good to go.
I won't say I was excited to do laundry, but I was excited to see how the pretty new appliances worked. I wanted to see if my colors looked good, how they looked on the pedestal. Oh, forget the pretense of being cool- I was excited to do laundry. What has my life come to?
Anyway, I drooled over my new machines and read the encyclopedia-sized manuals while Scott replaced the fitting. Then there was a scream from the basement. Apparently when he replaced one fitting, he overheated and screwed up another. A ten minute project turned into 30. Tick, tick, tick... would like to try the machines out before the ND game.... tick, tick, tick....
So I think I've made you wait long enough. Here it is- a lousy picture from my phone, but this is the fancy new appliances in place on the pedestal:
*sigh*
My girlfriend called it porn. {snicker} Laundry Porn, I love it. I had planned to have my husband print off vinyl letters that say, "Chambre de Blanchisserie" to place on the pedestal as that is supposed to mean something akin to 'Laundry Room' in French. But maybe I should use "Laundry Porn" instead?
Of course, some tweaks are required. First, I will not keep the baskets on top. I thought maybe that would work for storing soap and stuff, but actually there is room next to the baskets below and it is easier on my shoulder to lift soap up than pull it down. I have an old window frame which I need to clean up a little, knock a couple panes of glass out of, and hang on the back wall. I might even add a wreath to get the full effect from the laundry room I saw that I loved. If you are going to be a style thief, why not go all the way?
I'm debating about painting the ceiling the same color as the walls. I think the white ceiling is almost a distraction from that gorgeous color. I thought I'd want the white ceiling for the extra light, but now that we have the bright halogen light fixture I don't think it is necessary. I'm also considering having Scott build me a large black shelf above the washer and dryer so that I can put baskets and folded laundry up there without them dancing around when the washer is in spin cycle. Holy moly does that thing spin fast, it is like a plane getting ready for take off! There isn't a lot of vibration, but the surface is so slick on top that the baskets do shimmy quite a bit.
I also have a spot on the front edge of the black pedestal where the delivery guys scraped the paint off my stand. Not in an attractive, 'a little extra distressing' way. That needs to be repaired. And of course the walls outside need to be painted and trimmed and the closet doors put on. It will be a while before I can call this project completely done.
A review on the washer and dryer is coming soon, once I've had a chance to play with a few more cycles. The DIY instructions on the laundry stand and more detailed photos of it are coming soon too. I'll edit to add links when those posts are completed.
Thanks for checking it out... off to go see how my overnight-ready cycle worked on the washer!
We managed to get everything done in time. Friday night when Scott came home he had painted the ceiling and finished assembling the pedestal so it was ready to go. Lowe's gave us a time between noon and 2:00 which worked out well for our kids' sports schedules. We had a cross country invitational in the morning, 45 minutes away at 9 am. Our cheerleader didn't have to be at her game until 1:30pm but it was local. Lowe's arrived shortly after noon and finished installing in time for all of us to head off to her game.
A friend of ours had a daughter on the opposing team's cheer squad so we decided to take in a late lunch at Pizza Hut together before making a quick Home Depot run. I had left H2 to help my daughter get her hair done for cheering so at this point I hadn't even seen the appliances in place. Scott told me that everything worked great but when the washer was going he had a small leak in the basement. He needed to replace a fitting and it would be good to go.
I won't say I was excited to do laundry, but I was excited to see how the pretty new appliances worked. I wanted to see if my colors looked good, how they looked on the pedestal. Oh, forget the pretense of being cool- I was excited to do laundry. What has my life come to?
Anyway, I drooled over my new machines and read the encyclopedia-sized manuals while Scott replaced the fitting. Then there was a scream from the basement. Apparently when he replaced one fitting, he overheated and screwed up another. A ten minute project turned into 30. Tick, tick, tick... would like to try the machines out before the ND game.... tick, tick, tick....
So I think I've made you wait long enough. Here it is- a lousy picture from my phone, but this is the fancy new appliances in place on the pedestal:
*sigh*
My girlfriend called it porn. {snicker} Laundry Porn, I love it. I had planned to have my husband print off vinyl letters that say, "Chambre de Blanchisserie" to place on the pedestal as that is supposed to mean something akin to 'Laundry Room' in French. But maybe I should use "Laundry Porn" instead?
Of course, some tweaks are required. First, I will not keep the baskets on top. I thought maybe that would work for storing soap and stuff, but actually there is room next to the baskets below and it is easier on my shoulder to lift soap up than pull it down. I have an old window frame which I need to clean up a little, knock a couple panes of glass out of, and hang on the back wall. I might even add a wreath to get the full effect from the laundry room I saw that I loved. If you are going to be a style thief, why not go all the way?
I'm debating about painting the ceiling the same color as the walls. I think the white ceiling is almost a distraction from that gorgeous color. I thought I'd want the white ceiling for the extra light, but now that we have the bright halogen light fixture I don't think it is necessary. I'm also considering having Scott build me a large black shelf above the washer and dryer so that I can put baskets and folded laundry up there without them dancing around when the washer is in spin cycle. Holy moly does that thing spin fast, it is like a plane getting ready for take off! There isn't a lot of vibration, but the surface is so slick on top that the baskets do shimmy quite a bit.
I also have a spot on the front edge of the black pedestal where the delivery guys scraped the paint off my stand. Not in an attractive, 'a little extra distressing' way. That needs to be repaired. And of course the walls outside need to be painted and trimmed and the closet doors put on. It will be a while before I can call this project completely done.
A review on the washer and dryer is coming soon, once I've had a chance to play with a few more cycles. The DIY instructions on the laundry stand and more detailed photos of it are coming soon too. I'll edit to add links when those posts are completed.
Thanks for checking it out... off to go see how my overnight-ready cycle worked on the washer!
Friday, September 30, 2011
Nearing the deadline
Man, for just being a closet for laundry, this little area sure is requiring a lot of time and blog space!
This morning I sanded the drywall that Scott touched up last night as well as the ceiling. Have I mentioned before that I really dislike sanding drywall? Because I do dislike it, a lot. Normally I wouldn't even touch the ceiling as anything over my head is out of my domain, but it was looking pretty good so I thought I'd give it a go and see if we were at the point of calling it done. Covered in drywall dust head to toe, I felt like the stay-puff marshmallow man.
Before we can paint the ceiling, we needed to try to match the knockdown texture. We did all the drywall when we built the house nine years ago, and in some places it looks great. In others you can observe our amateur status. We weren't pros at drywall but we were kind of forced to take that task on to get our budget back on track after the contractor (we shall call him Nimrod) 'forgot' to include the cost of trusses in his bid. Eliminating the labor expense on drywall was a big step toward recovering our budget. Not being pros, however, we weren't doing anything fancy on the ceilings. I know that the popcorn look would have been the most forgiving but it is also something people seem to loathe with a passion so we compromised with a knock down texture that would mask imperfections.
To blend the extended ceiling into the old, we were not about to go through the mess and expense of renting a professional sprayer. For such a small area we bought a can of spray-on ceiling texture and hoped it would work ok. Scott came home at lunch today and put the texture up while my primer dried so I could get two coats of paint on the walls today.
He did a test spray on a piece of scrap drywall just to get a feel for the spray pattern. It was easy enough, just twist the nozzle, spray to desired thickness, let rest for a few minutes and use a 6-8" drywall knife to knock it down. After applying it we both felt there were a few areas that could use a little heavier texture so he touched up those spots. Within half an hour he was completely done with a 1' x 5' section. It isn't an exact match but close enough, especially for the laundry closet.Then my fun began.
I don't mind painting, but boring white primer and white semi-gloss on all the trim is getting old. White, white, give me color! I was dying to see if I liked the color I picked on the walls because if I didn't like it today was my one and only chance to change it. Once the washer and dryer are set in the space on their pedestal, there will be no chance at a do-over.
I had a hard time settling on a color. I've been checking out a lot of trends on Pinterest.com and I've been seeing a lot of beach glass greens and blues. I like those colors, and the temptation was definitely there to make this little laundry closet light and airy. But I decided to push out of my comfort zone a little and be bold. I'm never disappointed when I choose a rich color and yet I usually have to talk myself into it. I ended up settling on a color called "Big Cypress" by Pittsburgh Paints. It is sort of a cinnamon copper color.
First things first, I decided to tape off a 4 inch section at the front of the walls. This is so that when the white bi-fold doors are closed on the closet you won't be able to see the cinnamon color around the edges. Next I painted up around the new light fixture. I found this one at Lowe's for $20. I really like it because the halogen lights are very bright and the track lights can be positioned to focus the light in front of the machines where I will be pre-treating spots in the laundry.
Next I painted all the walls. I am really liking the color and I think it will look great with the champagne colored appliances and black pedestal.
Still need to apply one more coat and paint the ceilings, put the face plates on the utility boxes, mop the floor and finish the pedestal before tomorrow afternoon. Tonight is football homecoming, but it is freezing cold so I'm bowing out on the festivities to get the painting done. Then later tonight Scott can thaw out under the lights after taking our kids to the game and finish everything else. Tomorrow both girls have activities so we won't have a chance to do any last minute details, it all needs to be done tonight. Getting closer though!
This morning I sanded the drywall that Scott touched up last night as well as the ceiling. Have I mentioned before that I really dislike sanding drywall? Because I do dislike it, a lot. Normally I wouldn't even touch the ceiling as anything over my head is out of my domain, but it was looking pretty good so I thought I'd give it a go and see if we were at the point of calling it done. Covered in drywall dust head to toe, I felt like the stay-puff marshmallow man.
Before we can paint the ceiling, we needed to try to match the knockdown texture. We did all the drywall when we built the house nine years ago, and in some places it looks great. In others you can observe our amateur status. We weren't pros at drywall but we were kind of forced to take that task on to get our budget back on track after the contractor (we shall call him Nimrod) 'forgot' to include the cost of trusses in his bid. Eliminating the labor expense on drywall was a big step toward recovering our budget. Not being pros, however, we weren't doing anything fancy on the ceilings. I know that the popcorn look would have been the most forgiving but it is also something people seem to loathe with a passion so we compromised with a knock down texture that would mask imperfections.
To blend the extended ceiling into the old, we were not about to go through the mess and expense of renting a professional sprayer. For such a small area we bought a can of spray-on ceiling texture and hoped it would work ok. Scott came home at lunch today and put the texture up while my primer dried so I could get two coats of paint on the walls today.
| ceiling texture spray |
I don't mind painting, but boring white primer and white semi-gloss on all the trim is getting old. White, white, give me color! I was dying to see if I liked the color I picked on the walls because if I didn't like it today was my one and only chance to change it. Once the washer and dryer are set in the space on their pedestal, there will be no chance at a do-over.
I had a hard time settling on a color. I've been checking out a lot of trends on Pinterest.com and I've been seeing a lot of beach glass greens and blues. I like those colors, and the temptation was definitely there to make this little laundry closet light and airy. But I decided to push out of my comfort zone a little and be bold. I'm never disappointed when I choose a rich color and yet I usually have to talk myself into it. I ended up settling on a color called "Big Cypress" by Pittsburgh Paints. It is sort of a cinnamon copper color.
First things first, I decided to tape off a 4 inch section at the front of the walls. This is so that when the white bi-fold doors are closed on the closet you won't be able to see the cinnamon color around the edges. Next I painted up around the new light fixture. I found this one at Lowe's for $20. I really like it because the halogen lights are very bright and the track lights can be positioned to focus the light in front of the machines where I will be pre-treating spots in the laundry.
![]() |
| lights off |
![]() |
| lights on |
Still need to apply one more coat and paint the ceilings, put the face plates on the utility boxes, mop the floor and finish the pedestal before tomorrow afternoon. Tonight is football homecoming, but it is freezing cold so I'm bowing out on the festivities to get the painting done. Then later tonight Scott can thaw out under the lights after taking our kids to the game and finish everything else. Tomorrow both girls have activities so we won't have a chance to do any last minute details, it all needs to be done tonight. Getting closer though!
Subscribe to:
Posts (Atom)